
.jpg)
In this post, I will cover the topic of “How to set up persistent storage” using AWS instance store disks for applications running on Kubernetes clusters.
 Using OpenEBS with AWS Instance Stores
Instance store disks provide high performance, but they are not guaranteed to always be present in the node. This of course means that when the node is rescheduled you can potentially lose the data being stored. As such, there are two ways of obtaining storage on AWS for stateful applications:
- Using AWS EBS disks
- Using Local disks or instance store disks
Running Stateful Apps using EBS Volumes
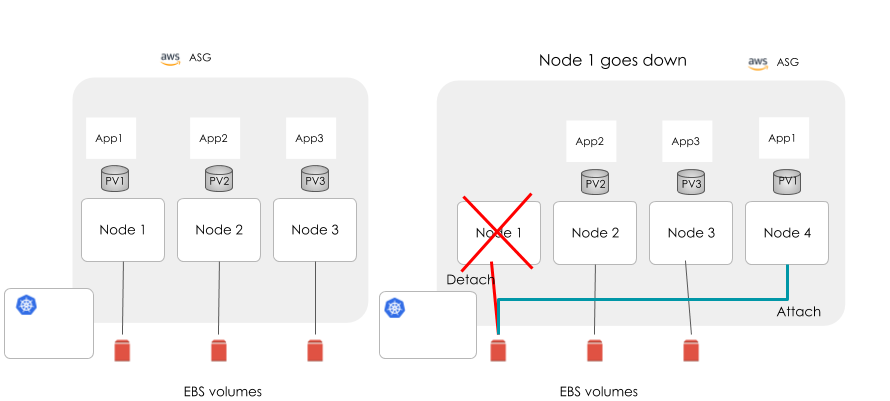

Stateful Applications using EBS volumes
The Problems with this Approach
- When a node goes down, a new node arises as part of Auto Scaling Groups (ASG). EBS disks that are associated with the old node must be detached from the old node and attached to the new node. This process is slow and not guaranteed to work seamlessly. Also, the new EBS volume will not contain any data.
- If user application is capable of performing replication, then it will replicate data to this new disk. This will take more time when using large amounts of data. This will have a negative impact on performance.
- EBS volumes are slow and users are not able to make use of faster disks such as SSDs and NVMe.
- Slow failover means effectively no High Availability.
- Poor I/O, unless you wish to spend a lot on unused disk space.
Why Can’t We Use Instance Disks as is for Kubernetes?
.png?width=876&name=image2%20(1).png)
 Stateful Applications using Instance Stores
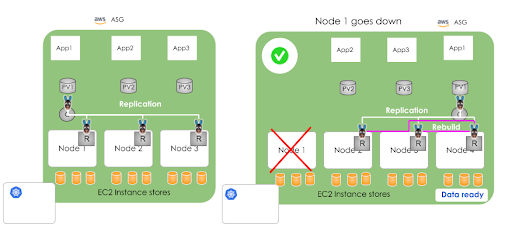
- When a node goes down, a new node arises with its own disks, meaning any data is lost. This is because of AWS’ auto scaling group and other policies. Per the ASG policy, the entire component associated with an instance is deleted during the termination of an EC2 instance. The user application, which has the capability to manage replication itself, has to manage the data replication across nodes.
- What if your applications do not have this capability?
- If a local disk fails, then your data is lost.
OpenEBS can Help Keep the Data Replicated across Nodes
OpenEBS is a viable option for high availability of data, combined with the advantages of using physical disks.
How is Replication Done with OpenEBS?
OpenEBS will have a minimum of 3 replicas to run the OpenEBS cluster with high availability. If a node fails, OpenEBS will manage the data to be replicated to a new disk, which will come up as part of ASG. In the meantime, your workload is in accessing the live data from one the replicas.
 Stateful Applications using OpenEBS and Instance Stores
How do we Quickly Demonstrate OpenEBS on AWS?
- Setup K8s nodes to auto mount the disks and configure iSCSI initiators during reboot.
- Similarly, configure the AWS “User Data” under the launch configuration to manage the iSCSI initiators and auto mounting of disks during launch or reboot.
- Install OpenEBS on Kubernetes Nodes. This should be simple, and a couple of methods are discussed at the beginning of our docs, either using a Helm Chart or directly from Kubectl. More details are mentioned in https://docs.openebs.io.
- Use OpenEBS Storage Classes to create Persistent Volumes for your stateful applications.
Below I provide step by step instructions that you should be able to cut, paste, and customize. As you can see, these include how to configure your AWS account for this simple POC as well.
Summary:
In summary, OpenEBS can be used to easily set up stateful applications on Kubernetes where AWS instance store disks are the underlying disks. This provides good manageability, improves resilience, and allows for relatively high performance for applications.
A detailed explanation of OpenEBS cluster deployment on AWS and rebuilding of persistent volumes are given in the section below.
Requirements
- AWS account with full access to EC2, S3, and VPC
- Ubuntu 16.04
- KOPS tool installed
- AWS CLI installed for AWS account access
- SSH key generated to access EC2 instances
On Local Ubuntu Machines
- Install with Ubuntu 16.04 LTS.
- Install the kops utility package. I have followed the official Kubernetes documentation to complete this. I have skipped step 2 and used my VPC ID so that it can fully communicate with its components.
- Install AWS CLI. This can be done here.
- Need an AWS account with full access to EC2, S3, and VPC.
- Generate a new ssh key. If you are not familiar with this, you can check go here.
Installing OpenEBS Cluster in AWS
You should have access to both the AWS management console and the local Ubuntu CLI for the installation of OpenEBS.
Perform the following operations from the AWS management console:
1. Create a Virtual Private Clout (VPC). To do this, go to VPC service and create a VPC.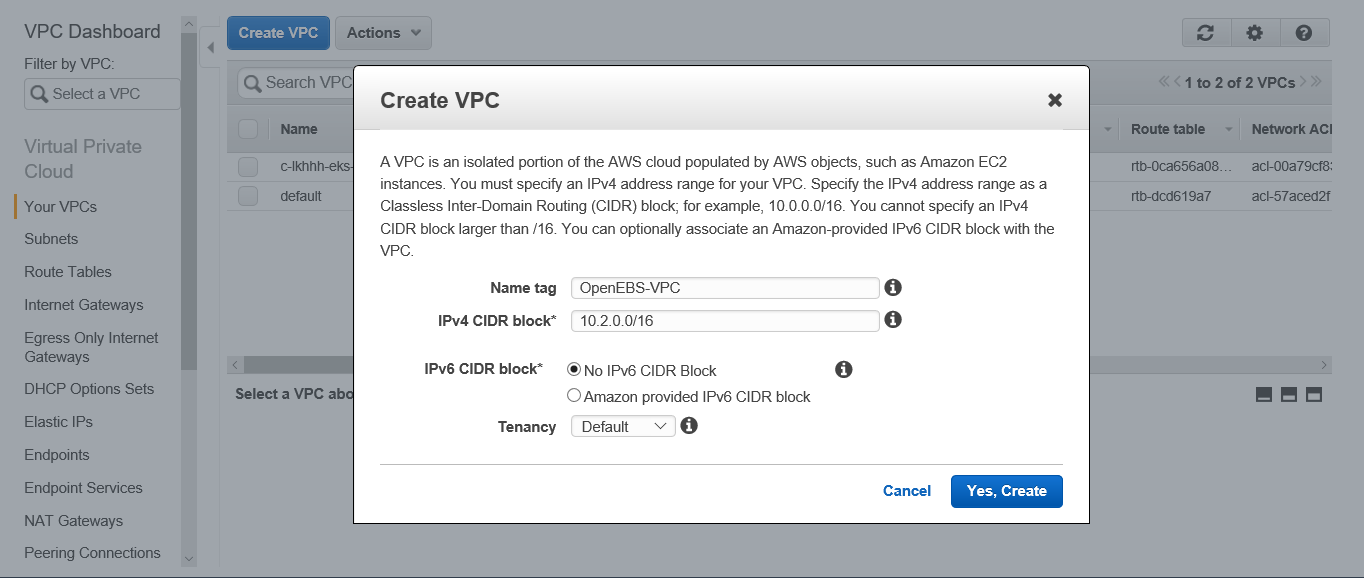

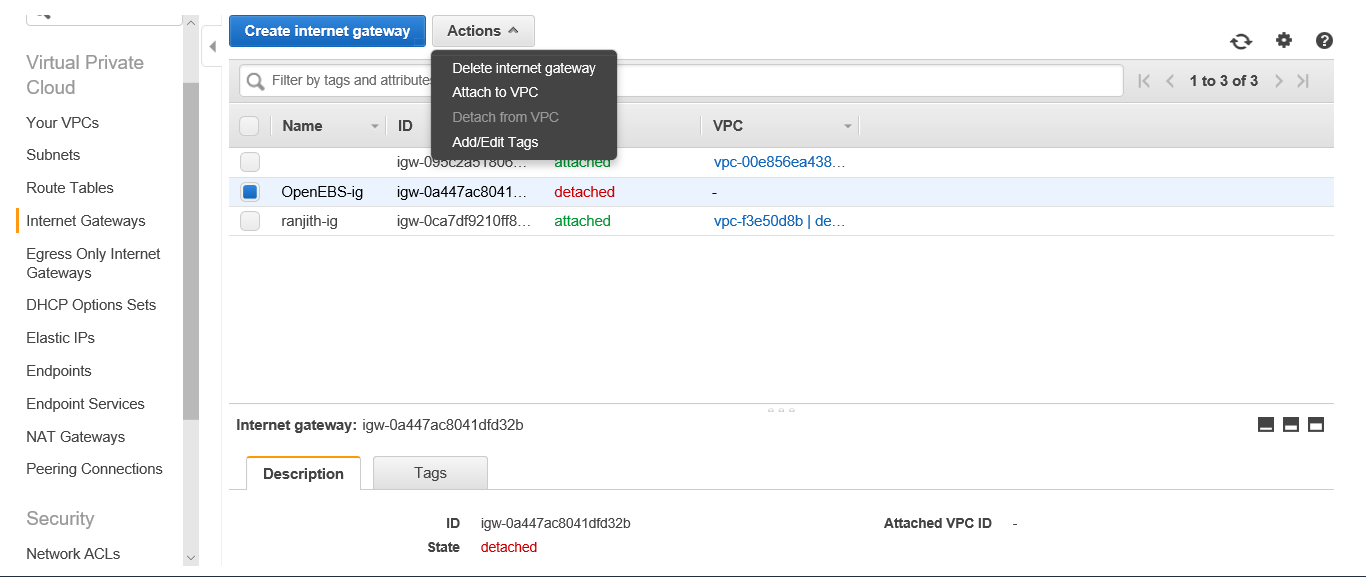
2. Create an Internet gateway and associate your VPC with this Internet Gateway. This will attach internet connectivity to your VPC. All nodes under this VPC will have the outside connectivity.
Perform the following procedure from your local ubuntu machine:
- Download the AWS CLI utility in your local machine.
- Connect with your AWS account by executing the following command:
| aws configure |
Note: You must specify your AWS Access Key, Secret Access Key, Default region name, and Default output format in order to keep the configuration details.
3. Create an S3 bucket to store your cluster configuration details as follows:
| aws s3 mb s3://<bucket_name> |
4. Export the s3 bucket details using the following command:
| export KOPS_STATE_STORE=s3://<bucket_name> |
5. Create the cluster using following command:
| kops create cluster — name=<cluster_name>.k8s.local — vpc=<vpc_id> — zones=<zone_name> |
This will create a cluster in the mentioned zone in your provided region as part of the AWS configuration.
6. Use the set of commands produced by the above step to customise your cluster configuration, such as Cluster name change, Instance group for Nodes, and master etc. Below is an example output.
Example:
Cluster configuration has been created.
Suggestions:
- list clusters with: kops get cluster
- edit this cluster with: kops edit cluster ranjith.k8s.local
- edit your node instance group: kops edit ig — name=ranjith.k8s.local nodes
- edit your master instance group: kops edit ig — name=ranjith.k8s.local master-us-west-2a
Finally, configure your cluster with: kops update cluster name.k8s.local — yes
7. Change your instance image type and the number of machines by executing the corresponding commands. The exact command needed for your cluster will be shown at the end of the previous step. The following is an example.
Example:
Change your node configuration by executing as follows:
| kops edit ig — name=<cluster_name>.k8s.local nodes |
Change your master instance type and number of machines by executing as follows:
| kops edit ig — name=<cluster_name>.k8s.local master-<zone_name> |
Note: We used c3.xlarge as the instance type for both Master and Nodes. The number of worker nodes used is 3 and master node as 1.
8. Once the customization is done, you can update the changes as follows:
| kops update cluster <cluster_name>.k8s.local — yes |
9. The above step will deploy a 3 Node OpenEBS cluster in AWS. You can check the instance creation status by finding the EC2 instance page and choosing the corresponding region.
10. From the EC2 instance page, obtain each instance type Public IP.
Example:
-1.png?width=634&name=unnamed%20(1)-1.png)
11. Go to the Launch Configuration section in the EC2 page and take a copy of the Launch configuration for nodes. Select the configuration for Node group and click on the Actions pane.
Example:


12. Perform changes in the Configure Details section as follows:
a. Change the new configuration name if required.
b. Edit the Advanced Details section and add the following entry at the end of the User data section.
| #!/bin/bash set -x date apt-get install open-iscsi grep “@reboot root sleep 120;service open-iscsi restart” /etc/crontab || sudo sh -c ‘echo “@reboot root sleep 120;service open-iscsi restart” >> /etc/crontab’ systemctl enable open-iscsi sh -c ‘echo “/dev/xvdd /mnt/openebs_xvdd auto defaults,nofail,comment=cloudconfig 0 2” >> /etc/fstab’ reboot set -x umount /mnt/openebs/xvdd mount /dev/xvdd /mnt/openebs_xvdd |
Example:
-1.png?width=567&name=unnamed%20(2)-1.png)

13. Go to the Auto Scale Group section in the EC2 page. Select the configuration for Node group and click on the Actions pane to edit Launch Configuration. Change the existing one with the new Launch Configuration and save the new setup.
Example:
.png?width=619&name=unnamed%20(3).png)

14. SSH to each node using its public key as follows:
| ssh -i ~/.ssh/id_rsa admin@<public_ip> |
15. SSH to all Nodes where OpenEBS will be installed, and perform the following commands to install the iSCSI packages and auto mounting of the local disk during reboot.
| sudo apt-get update sudo apt-get install open-iscsi sudo service open-iscsi restart sudo cat /etc/iscsi/initiatorname.iscsi sudo service open-iscsi status sudo sudo sh -c ‘echo “/dev/xvdd /mnt/openebs_xvdd auto defaults,nofail,comment=cloudconfig 0 2” >> /etc/fstab’ grep “@reboot root sleep 120;service open-iscsi restart” /etc/crontab || sudo sh -c ‘echo “@reboot root sleep 120;service open-iscsi restart” >> /etc/crontab’ sudo reboot |
16. SSH to Master Node and perform the following commands to clone the OpenEBS yaml file and deploy.
| wget https://raw.githubusercontent.com/openebs/openebs/v0.6/k8s/openebs-operator.yaml wget https://raw.githubusercontent.com/openebs/openebs/v0.6/k8s/openebs-storageclasses.yaml |
17. Edit openebs-operator.yaml and add the following entry. This will create a storage pool on one of the local disks attached to the hosts. Refer to OpenEBS Storage Pools for more information.
| — - apiVersion: openebs.io/v1alpha1 kind: StoragePool metadata: name: jivaawspool type: hostdir spec: path: “/mnt/openebs_xvdd” — - |
18. Edit openebs-storageclasses.yaml by adding the following entry in your corresponding storage class:
| openebs.io/storage-pool: “jivaawspool” |
Example:
| — - apiVersion: storage.k8s.io/v1 kind: StorageClass metadata: name: openebs-percona provisioner: openebs.io/provisioner-iscsi parameters: openebs.io/storage-pool: “default” openebs.io/jiva-replica-count: “3” openebs.io/volume-monitor: “true” openebs.io/capacity: 5G openebs.io/storage-pool: “jivaawspool” — - |
19. Apply openebs-operator.yaml by executing the following command:
| kubectl apply -f openebs-operator.yaml |
20. Apply openebs-storageclasses.yaml by executing the following command:
| kubectl apply -f openebs-storageclasses.yaml |
21. Deploy your application yaml that will be created on the local disk.
Example:
| kubectl apply -f percona-openebs-deployment.yaml |
22. To check the status of applicationa and Jiva Pods, use the following command:
| kubectl get pods -o wide |
An output similar to the following should be displayed.
| NAME READY STATUS RESTARTS AGE IP NODE percona-7f6bff67f6-cz47d 1/1 Running 0 1m 100.96.3.7 ip-172–20–40–26.us-west-2.compute.internal pvc-ef813ecc-9c8d-11e8-bdcc-0641dc4592b6-ctrl-84bcf764d6–269rj 2/2 Running 0 1m 100.96.1.4 ip-172–20–62–11.us-west-2.compute.internal pvc-ef813ecc-9c8d-11e8-bdcc-0641dc4592b6-rep-54b8f49ff8-bzjq4 1/1 Running 0 1m 100.96.1.5 ip-172–20–62–11.us-west-2.compute.internal pvc-ef813ecc-9c8d-11e8-bdcc-0641dc4592b6-rep-54b8f49ff8-lpz2k 1/1 Running 0 1m 100.96.2.8 ip-172–20–32–255.us-west-2.compute.internal pvc-ef813ecc-9c8d-11e8-bdcc-0641dc4592b6-rep-54b8f49ff8-rqnr7 1/1 Running 0 1m 100.96.3.6 ip-172–20–40–26.us-west-2.compute.internal |
23. Obtain the status of PVC using the following command:
| kubectl get pvc |
An output similar to the following is displayed.
| NAME STATUS VOLUME CAPACITY ACCESS MODES STORAGECLASS AGE demo-vol1-claim Bound pvc-ef813ecc-9c8d-11e8-bdcc-0641dc4592b6 5G RWO openebs-percona 3m |
24. View the status of PV using the following command:
| kubectl get pv |
The output from the above command will be similar to the following.
| NAME CAPACITY ACCESS MODES RECLAIM POLICY STATUS CLAIM STORAGECLASS REASON AGE pvc-ef813ecc-9c8d-11e8-bdcc-0641dc4592b6 5G RWO Delete Bound default/demo-vol1-claim openebs-percona 3m |
Now you have deployed OpenEBS with AWS local disk in your k8s environment. You will see the advantages of both low latency local disk use and fault tolerant architecture ensured by OpenEBS.
Hopefully this helps you to better understand the benefits of using OpenEBS on top of AWS. Thank you for reading and please provide any feedback below or via twitter — @ranjithr005


Game changer in Container and Storage Paradigm- MayaData gets acquired by DataCore Software
Don Williams
Don Williams
Managing Ephemeral Storage on Kubernetes with OpenEBS
Kiran Mova
Kiran Mova
Understanding Persistent Volumes and PVCs in Kubernetes & OpenEBS
Murat Karslioglu
Murat Karslioglu