

This blog will give you a glimpse of one of the most awaited features in OpenEBS Director “OpenEBS Installation”.
OpenEBS Director is now a one-stop solution for OpenEBS users which makes OpenEBS Installation and OpenEBS Upgrade a cakewalk for OpenEBS users.
This blog will give you a walkthrough of OpenEBS Installation which has been introduced in OpenEBS Director 1.8.0.
Click here to get more information on OpenEBS Upgrade through OpenEBS Director.
.png?width=660&name=Single-Click%20OpenEBS%20Installation%20(1).png)
OpenEBS Installation via Director
OpenEBS Director is free for primary usage and is available both as a SaaS service and OnPrem (as a Kubernetes-native application).
It supports the installation of the latest OpenEBS version 1.8.0 and that too with a single click. Director gives you a GUI where you can continuously monitor the installation status of all the OpenEBS components being installed, you can also take a look at the installation summary, which will show the status of all the components being installed along with some other details.
Steps for OpenEBS Installation via Director
- Connect your OpenEBS cluster to Director: For connecting your cluster to Director Online, follow these steps, Director OnPrem users can follow these steps.
- After connecting your cluster to Director Online/OnPrem,
a. Go to Clusters on the sidebar menu.
b. Click on the OpenEBS cluster where you want to install OpenEBS.
c. You will get a popup asking you to go ahead with the OpenEBS Installation if OpenEBS is not already installed in your cluster.
Click on the Begin Installation button.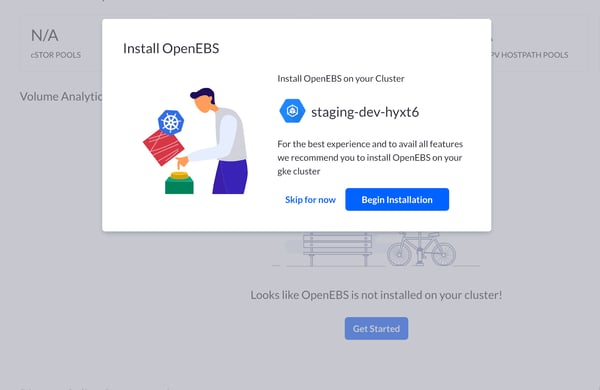
- Now, you can see the two different modes of OpenEBS Installation supported by OpenEBS Director, Basic and Advanced.
Basic - You should go ahead with this mode of installation when you don’t want to configure anything i.e., OpenEBS will be installed with all the default values on a single click.
Note: In this mode, OpenEBS will be installed in openebs namespace with /var/openebs as the default directory, quay.io/openebs/ as the docker registry, 100m CPU and 200Mi memory will be used as default to set the resource limit, all the nodes of the cluster will be considered for deploying the control as well as data-plane components, loop,/dev/fd0,/dev/sr0,/dev/ram,/dev/dm-,/dev/md is used as the default value of exclude path filters for NDM, etc.
Advanced - You should go ahead with this mode of installation if you want to configure some of the values before going ahead with the installation and these values can include namespace where you want to install OpenEBS, default directory, docker registry, ndm filters, etc.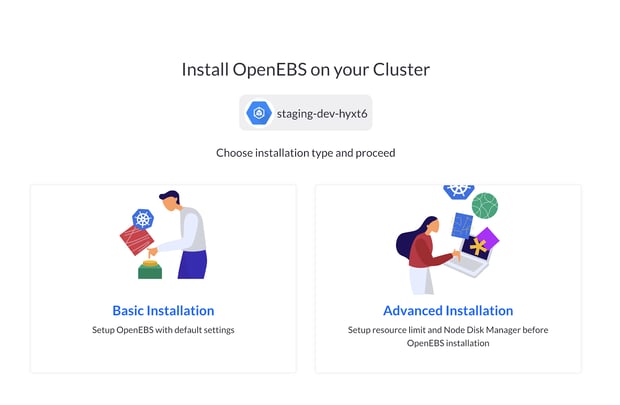
- Clicking on Basic Installation will take you directly to the confirmation page where you can click on the Deploy OpenEBS button. Clicking on the Deploy OpenEBS button will redirect you to the installation status page(step 6) which will show you the components getting installed and their statuses and then to the installation summary page(step 7).
- Clicking on Advanced Installation will take you to the various installation configuration pages described below in a sequential manner:
Introduction page where you can configure namespace, default directory and a custom docker registry if any.
Click on Next after filling the values in the given fields if any.
Note: All these fields are optional and the default values for them are already being displayed, change is recommended only if you want it to have a value different than the filled one.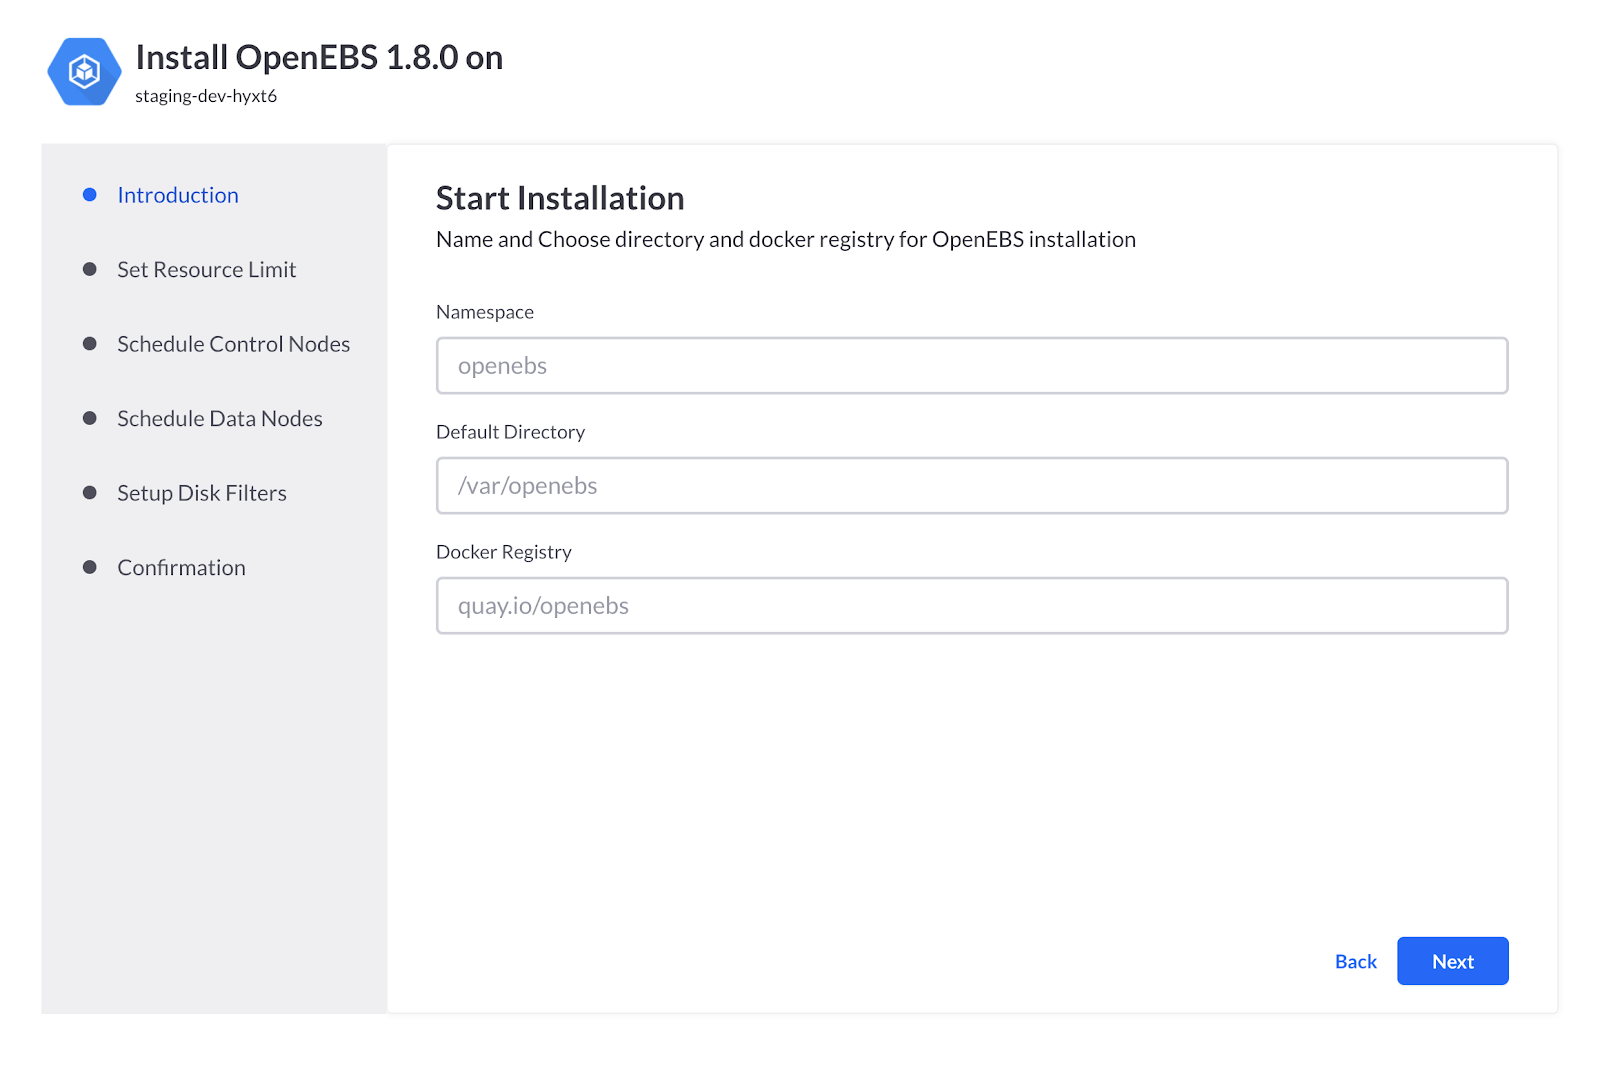
Set Resource Limit Page provides you the option to set the resource limits(maximum resources that can be utilized by OpenEBS components) of all the OpenEBS control-plane components.
A number of recommended options are given here in terms of application size which can be for smaller applications, medium applications, and large applications.
Users can also set the custom value for the resource limit.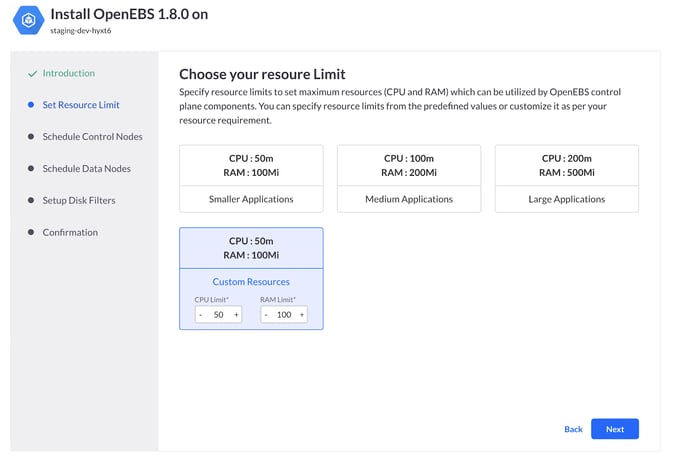
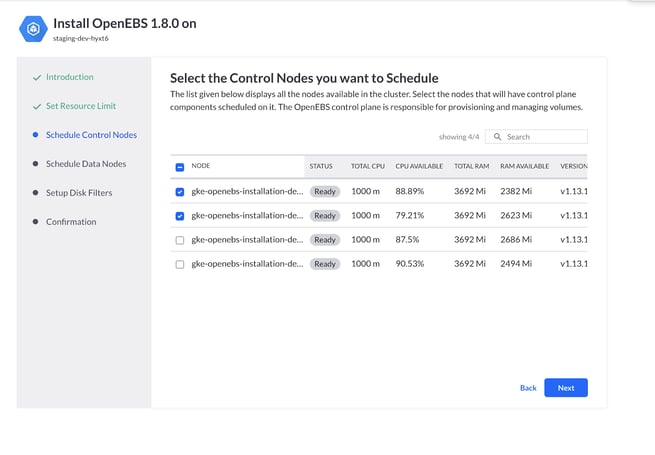
Schedule Control Nodes Page provides you the option to schedule the OpenEBS control-plane components to a specific set of nodes. OpenEBS control-plane components are responsible for a number of tasks including provisioning and management of volumes, etc.
This page displays all the nodes of the cluster with their details such as total CPU, CPU available, total RAM, RAM available, labels, taints, etc using which the user can make a decision of selecting the best or the right nodes to schedule the OpenEBS control-plane components.
Note: Some or all of the nodes must be selected for scheduling the control-plane components, this is not an optional step.
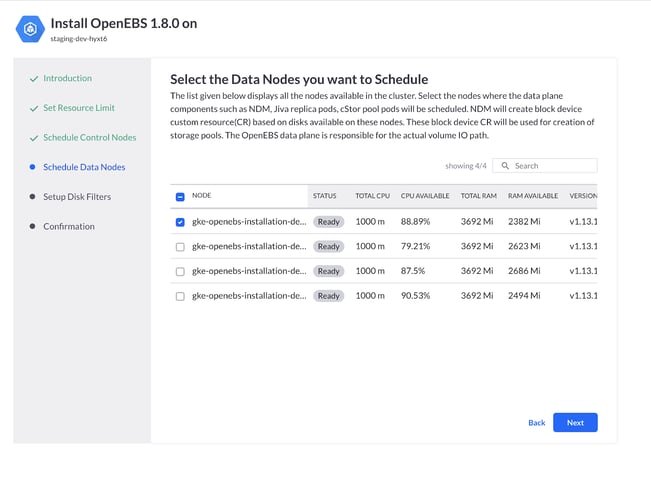
 Schedule Data Nodes Page provides you the option to schedule the OpenEBS data-plane components to a specific set of nodes.
OpenEBS data-plane components include NDM daemonset which is responsible for discovering the block devices on the nodes based on the disks attached to the nodes.
The OpenEBS data-plane also consists of cStor pool pods, replica pods, etc and is responsible for the actual volume IO path also.
This page displays all the nodes of the cluster with their details such as total CPU, CPU available, total RAM, RAM available, labels, taints, etc using which the user can make a decision of selecting the best or the right nodes to schedule the OpenEBS data-plane components.
Note: Some or all of the nodes must be selected for scheduling the data-plane components, this is not an optional step.
Setup Disk Filters Page provides you the option to configure the disk filters which in turn helps NDM to create the block device CRs.
BlockDevices can be filtered in two ways using Include and Exclude filters.
Disk mount paths given in the Exclude will be ignored by NDM while creating block devices however those which are in Include will be considered.
The default value of the exclude filter is already provided in the Exclude field.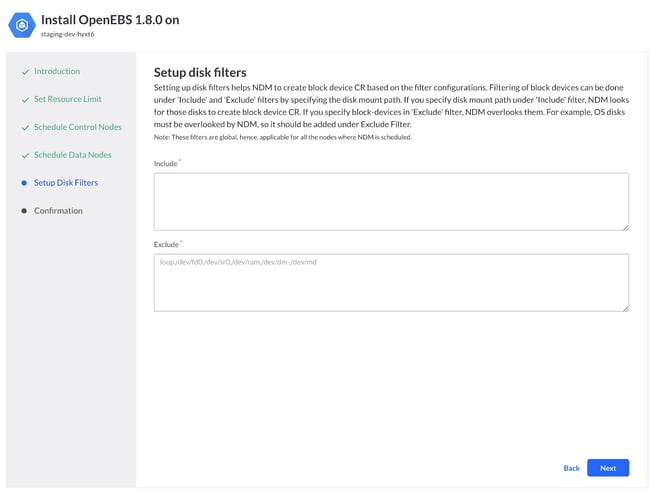
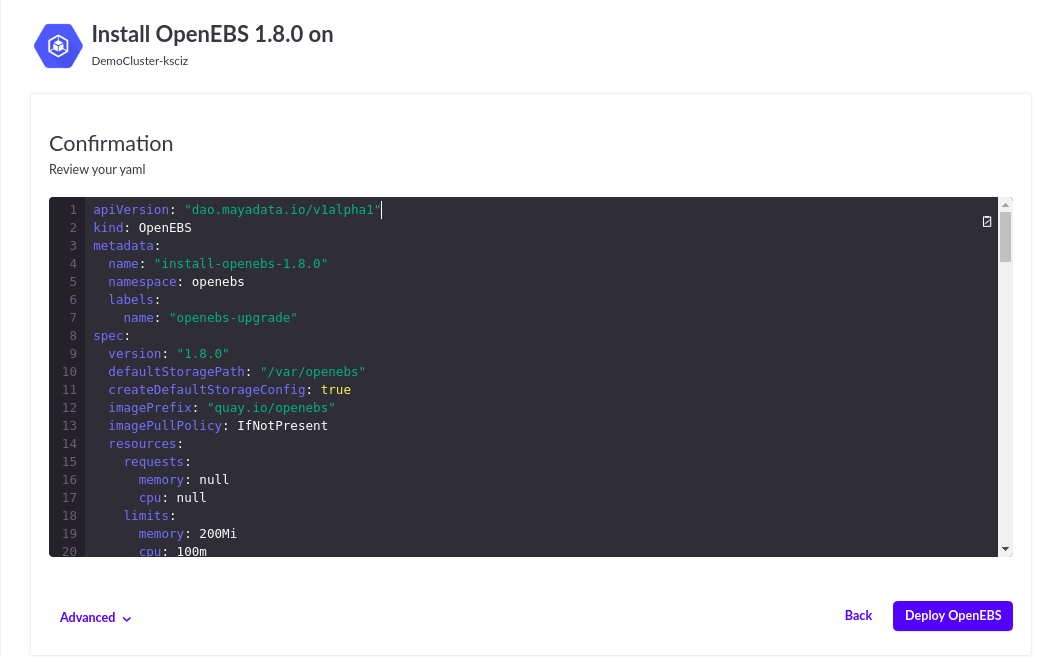
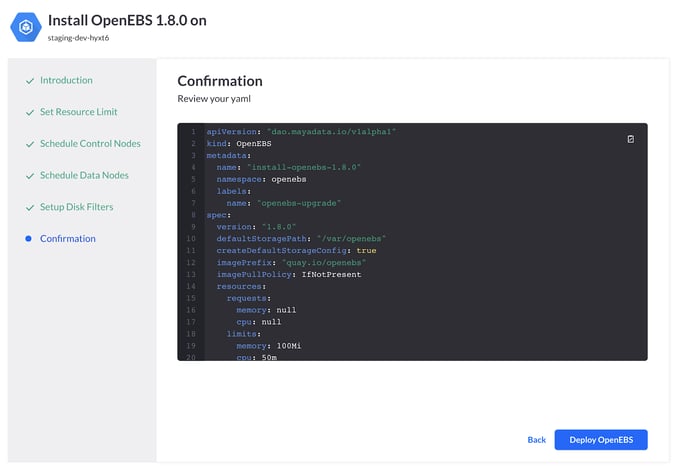
Confirmation Page displays the formed OpenEBS CR YAML with all the configured values.
OpenEBS CR is the custom resource that specifies the details of OpenEBS installation as per the given configuration.
Clicking on the Deploy OpenEBS button will start the OpenEBS installation process and will redirect to the installation status page.
Note: OpenEBS CR YAML is not the openebs-operator.yaml which OpenEBS users used to apply in the cluster, its just a custom resource that specifies the installation configuration.
 6. Once the installation is triggered, you will be redirected to see the installation status i.e., the components getting installed and their statuses.
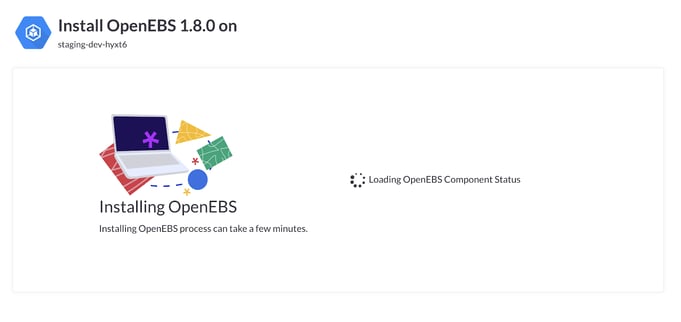 7. Once all the OpenEBS components are successfully installed or if the installation is taking more than usual time say 3 minutes or something, you will be redirected to the installation summary page where you can see the current installation status or the detailed installation summary which may include the selected control/data nodes count along with the installed component’s status.
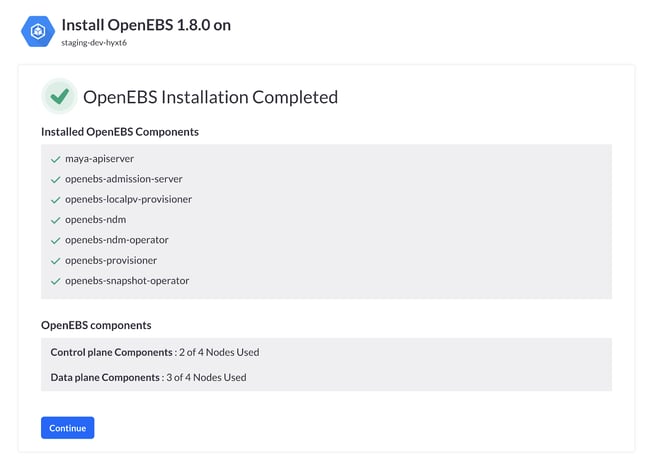
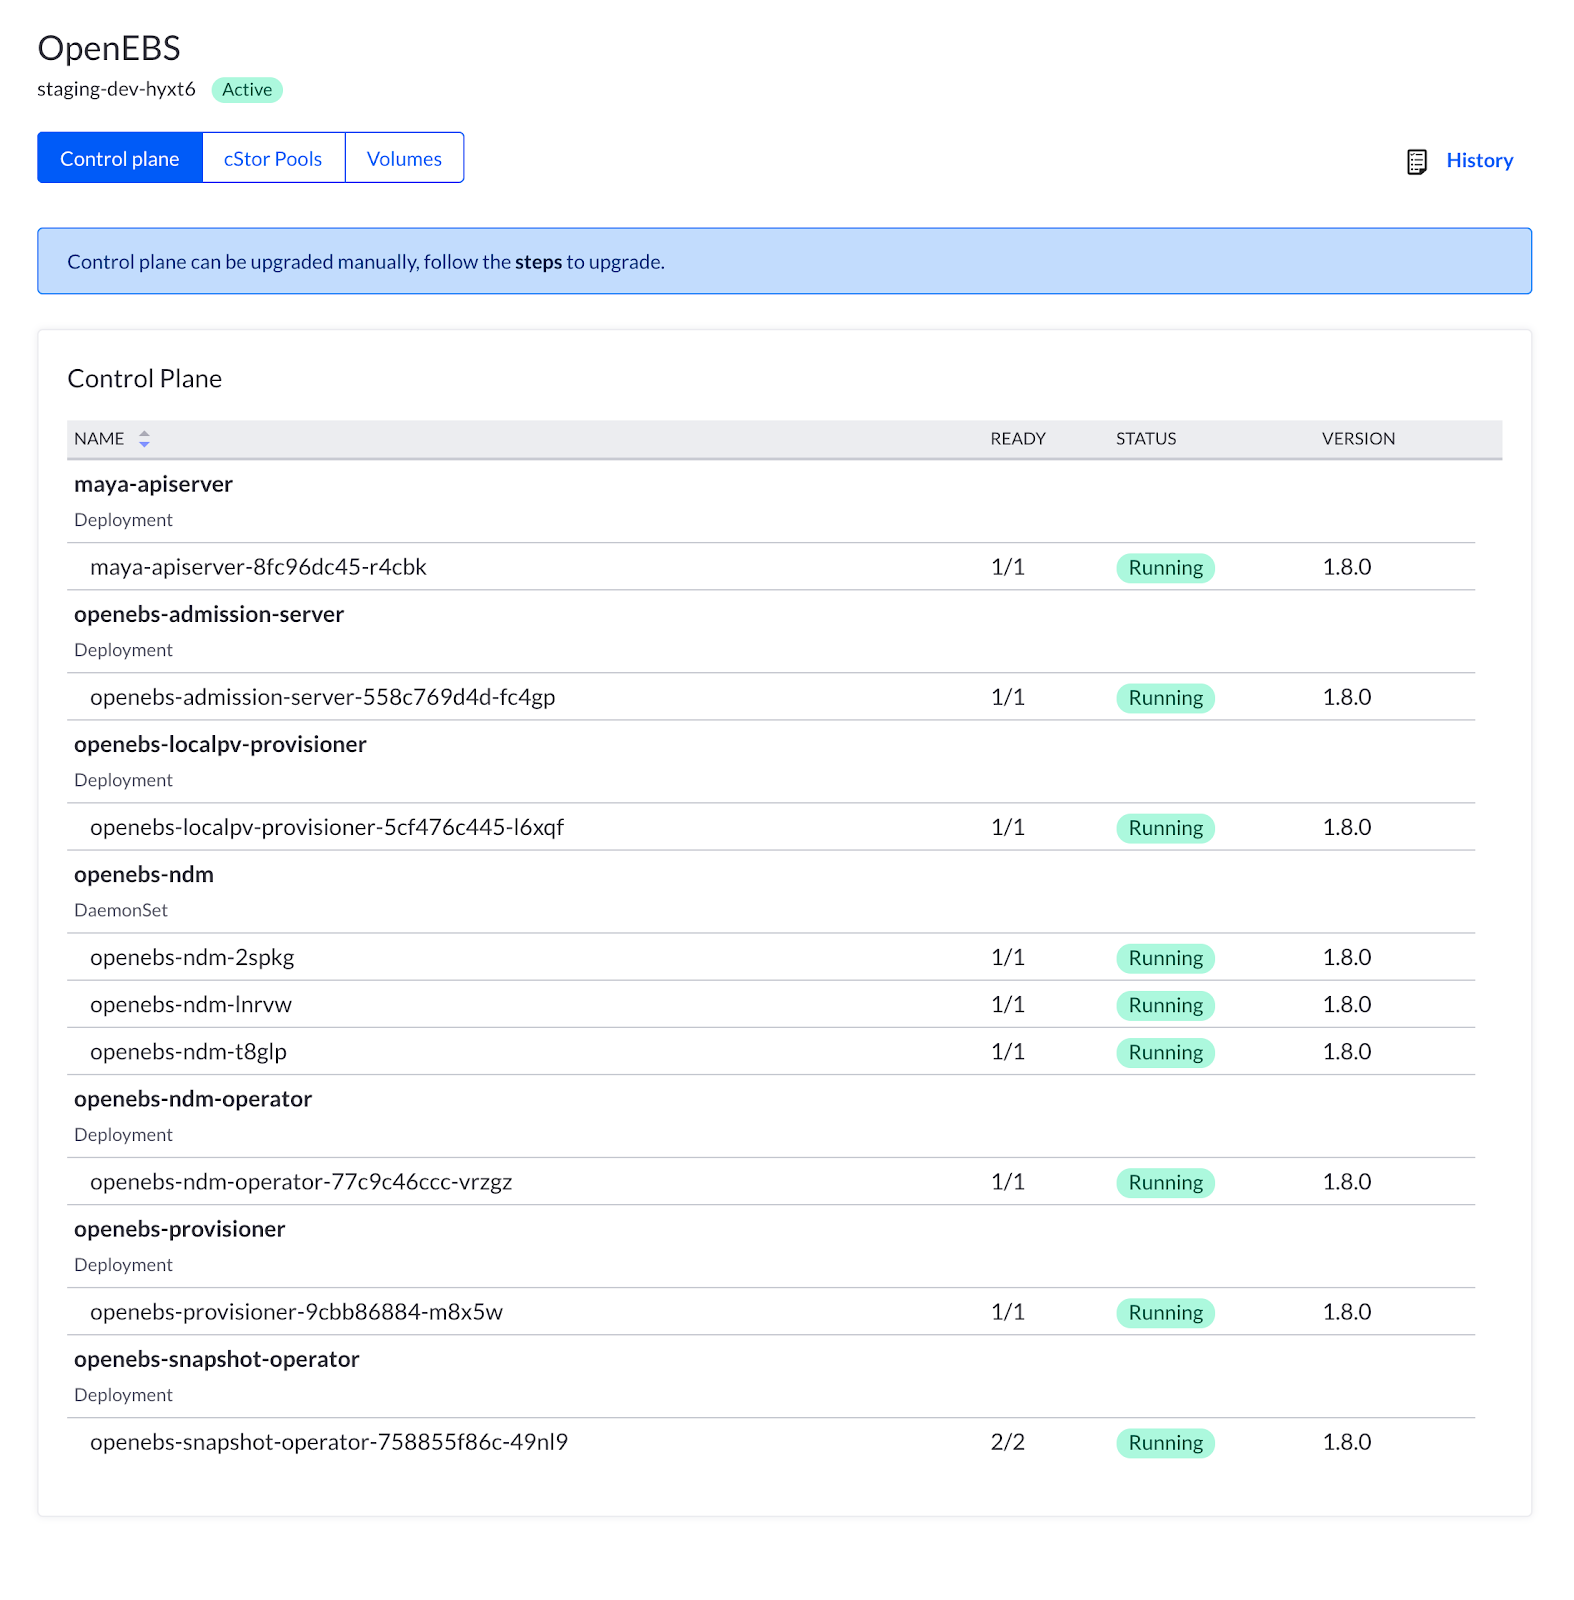
8. Clicking on the Continue button will take you to the control-plane components page where you can monitor the status of the control-plane components.
 Summary
Now OpenEBS users can easily install as well as upgrade the OpenEBS components on a single click using OpenEBS Director and that too for free! They can now freely access a GUI where they can see the detailed installation status of all the resources being installed as well as the installation summary.
Sign up now at MayaData for installing as well as upgrading your OpenEBS components on a single click.
Important Links
Join the OpenEBS community — slack.openebs.io


Game changer in Container and Storage Paradigm- MayaData gets acquired by DataCore Software
Don Williams
Don Williams
Managing Ephemeral Storage on Kubernetes with OpenEBS
Kiran Mova
Kiran Mova
Understanding Persistent Volumes and PVCs in Kubernetes & OpenEBS
Murat Karslioglu
Murat Karslioglu