

K3OS is a Linux distribution built to run lightweight Kubernetes clusters called K3s. It is specifically designed only to have what is needed to run k3s.
In this blog, more of a tutorial, I will walk you through the steps to install K3OS and setup OpenEBS, a CNCF project, and leading Open Source Container Attached Storage solution for Kubernetes Stateful Workloads.
Setting up K3OS in vSphere
K3OS kernel is forked from Ubuntu-18.04 LTS, and its userspace binaries are from alpine. So, you need to select Ubuntu Linux (64 bit) as the guest operating system while creating a virtual machine.
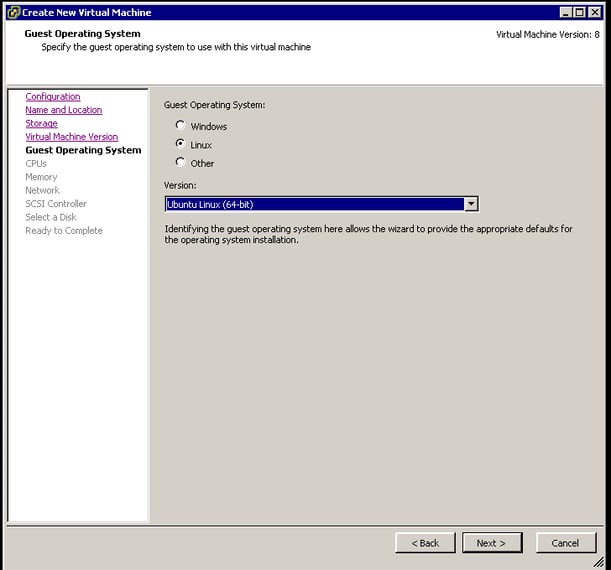 Select guest operating system
Download the latest K3OS iso file(currently v0.9.0) from its GitHub release page. Attach the iso file into a virtual machine and start it with the live installation option, as shown below.
Select the option K3OS LiveCD & install and boot the operating system.
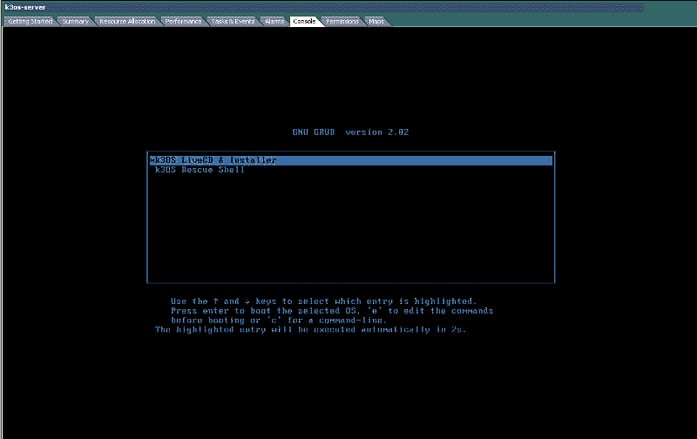 Live installation
After booting up successfully, you will be landed in a login prompt. The default user in K3OS is rancher. You can login as rancher user without any password.
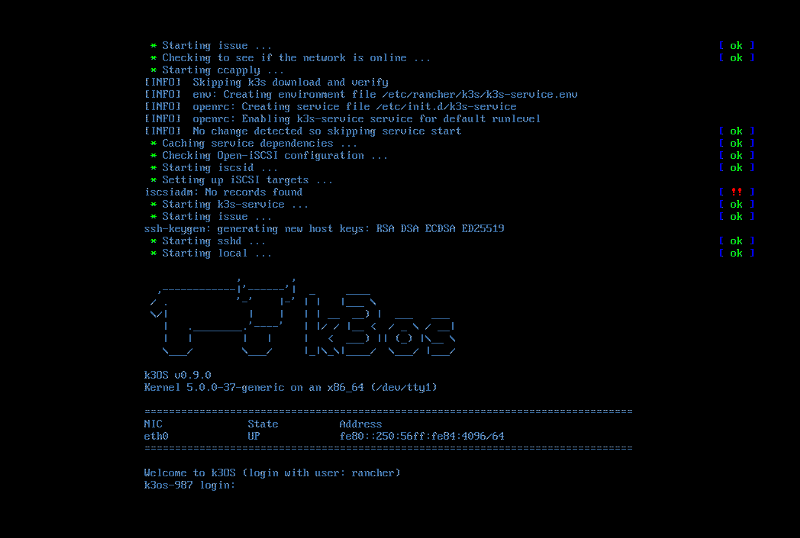 Login prompt
After performing a live install, You need to install the Operating system into a disk and can configure the machine either as a server(Master) or an agent(worker). This can be performed by executing the command sudo k3os install.
Select option 1. Install to disk to install K3OS into the disk. In the preceding questions, set up a new password for rancher user for enabling ssh communication to the server.
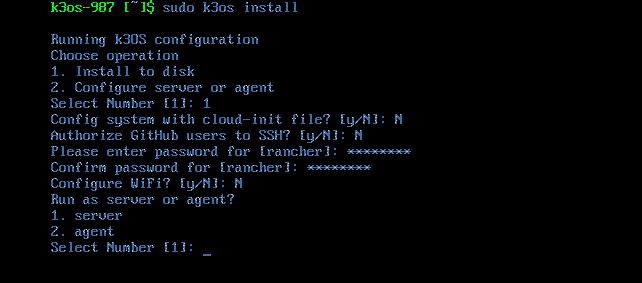 Installing into disk
Installing into disk
You need to select either server or agent to install the relevant components in the machine. Select 1.server to deploy K3s server components. You can set up a token or cluster secret that could be used while joining K3s agents to the server.
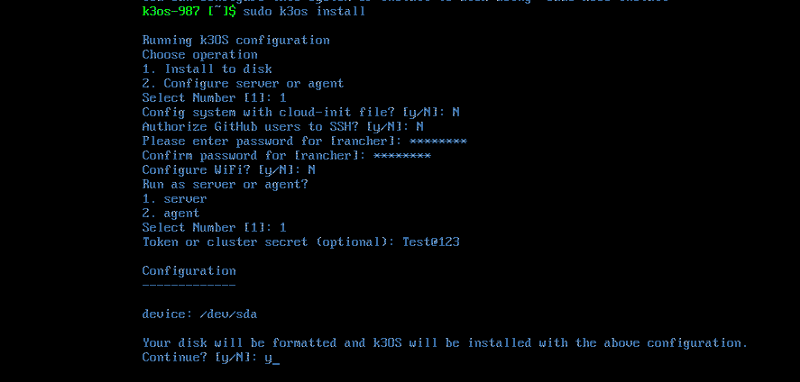 Server installation
After completing the installation, a screen similar to the following one will be displayed.
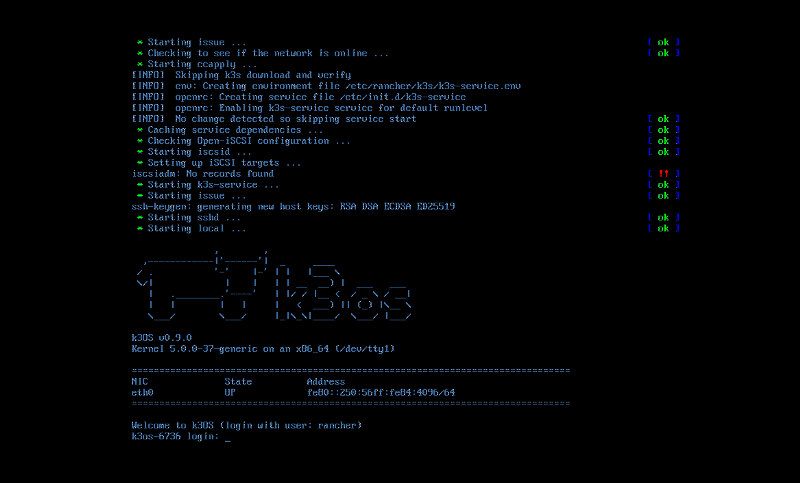 Login prompt
Thus, the K3s server can be configured successfully. In case if DHCP is not configured, you need to assign an IP address and other networking details using connmanctl utility. Login into the server as rancher user and enter the password configured in the previous step.
Let us find the connman network service bound to the eth0 device by executing the below command.
sudo connmanctl servicesThe above command will list the services below.

After identifying the service, you can assign the IP address, netmask, gateway, and DNS server through the following command.
sudo connmanctl config <ethernet service> --ipv4 manual <IP Address> <Netmask> <gateway> --nameservers <DNS Address>After executing the above command, ensure if the network is configured correctlly through ifconfig command.
Reboot the machine after setting up networking.
Install K3s agent
In K3s nomenclature, Kubernetes workers are called as agents. While installing k3os into a disk, you need to select the option 2. agent to configure K3s agent in the machine.
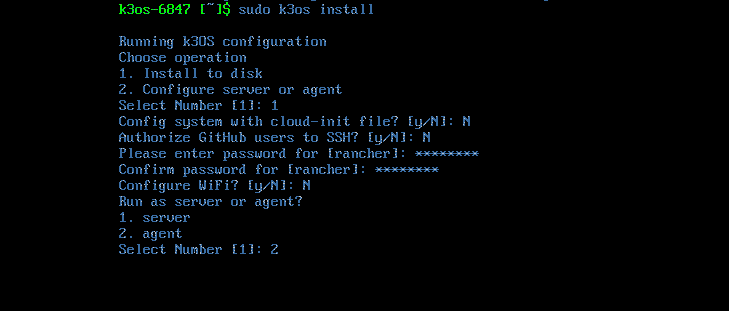
After selecting Agent, you need to provide the URL of the server to which the agent has to be configured. The URL of the k3s server could be formed in the following way.
https://<K3s Server IP Address>:6443After entering the URL, you need to provide the cluster secret, which was configured during server installation.
After providing all the above inputs, initiate the agent deployment.
Configure networking in the same way as performed above for server and reboot the machine.
After rebooting the agent machine, check the cluster status in the server as follows.
k3os-1374 [~]$ kubectl get nodes
NAME         STATUS   ROLES    AGE     VERSION
k3os-1374    Ready    master   10m    v1.17.2+k3s1
k3os-15360   Ready    <none>   10m    v1.17.2+k3s1
k3os-1091    Ready    <none>   10m    v1.17.2+k3s1
Check if all the cluster components are configured successfully and all the pods are running successfully by executing the below command.
k3os-1374 [~]$ kubectl get pods -n kube-system
NAME                                      READY   STATUS      RESTARTS   AGE
helm-install-traefik-nmjvj                0/1     Completed   0          3d
svclb-traefik-gp9ff                       2/2     Running     1         2d23h
svclb-traefik-qgdlx                       2/2     Running     0         2d23h
local-path-provisioner-58fb86bdfd-wkdtm   1/1     Running     1         3d
metrics-server-6d684c7b5-mrxsr            1/1     Running     0         3d
svclb-traefik-c4v7l                       2/2     Running     0         3d
coredns-d798c9dd-td5tr                    1/1     Running     0         3d
traefik-6787cddb4b-n57jz                  1/1     Running     0         3d
Install OpenEBS
OpenEBS is a CNCF project delivering persistent block storage to the workloads deployed in Kubernetes. cStor is one of the storage engines provided by OpenEBS besides Jiva and Local PV.
cStor was not supported in K3OS till k3os-v0.8.0 due to this issue. This issue has been addressed in v0.9.0 by adding udev support.
k3os-1374 [~]$ kubectl apply -f openebs-operator-1.7.0.yaml
namespace/openebs created
serviceaccount/openebs-maya-operator created
clusterrole.rbac.authorization.k8s.io/openebs-maya-operator created
clusterrolebinding.rbac.authorization.k8s.io/openebs-maya-operator created
deployment.apps/maya-apiserver created
service/maya-apiserver-service created
deployment.apps/openebs-provisioner created
deployment.apps/openebs-snapshot-operator created
configmap/openebs-ndm-config created
daemonset.apps/openebs-ndm created
deployment.apps/openebs-ndm-operator created
deployment.apps/openebs-admission-server created
deployment.apps/openebs-localpv-provisioner created
Check if all the OpenEBS components are running successfully.
k3os-1374 [~]$ kubectl get pods -n openebs
NAME                                           READY   STATUS    RESTARTS   AGE
openebs-admission-server-f67f77588-8kl78       1/1     Running   0          65s
openebs-provisioner-7b8c68bf44-7bjw8           1/1     Running   0          66s
openebs-ndm-qp26v                              1/1     Running   0          66s
openebs-ndm-84zb4                              1/1     Running   0          66s
openebs-ndm-dzghs                              1/1     Running   0          66s
openebs-localpv-provisioner-5c87bbd974-55486   1/1     Running   0          65s
openebs-ndm-operator-5fccfb7976-dvhj6          1/1     Running   0          66s
openebs-snapshot-operator-6c4c64d4bc-qxdwd     2/2     Running   0          66s
maya-apiserver-84785d7fbd-ck7sh                1/1     Running   0          66s
OpenEBS cStor engine requires external disks to be attached to the agents which group to form cStor Pools.
The disks or block devices are managed by the component called Node disk manager, shortly called as NDM. After attaching the disks to agent machines, check the block devices by executing the following command.
k3os-1374 [~]$ kubectl get blockdevices -n openebs
NAME                                           NODENAME     SIZE          CLAIMSTATE   STATUS   AGE
blockdevice-30a3eb18f5b9e2d470de45e39f1036b0   k3os-15360   17179869184   Unclaimed    Active   1h
blockdevice-86fc964305abe8970fc1508538a61dbc   k3os-1374    17179869184   Unclaimed    Active   1h
blockdevice-b8735721689d5843bca10e7028f60a4e   k3os-1091    17179869184   Unclaimed    Active   1h
In this case, one block device has been attached to each K3s agent machine. Let us populate these block devices in the below pool creation manifest under spec.blockDevices and create the pool.
apiVersion: openebs.io/v1alpha1
kind: StoragePoolClaim
metadata:
  name: cstor-disk-pool
  annotations:
    cas.openebs.io/config: |
      - name: PoolResourceRequests
        value: |-
            memory: 2Gi
      - name: PoolResourceLimits
        value: |-
            memory: 4Gi
spec:
  name: cstor-disk-pool
  type: disk
  poolSpec:
    poolType: striped
  blockDevices:
    blockDeviceList:
    - blockdevice-30a3eb18f5b9e2d470de45e39f1036b0
    - blockdevice-86fc964305abe8970fc1508538a61dbc
    - blockdevice-b8735721689d5843bca10e7028f60a4e
After applying the above definition, check if the pools are created successfully by executing the following command.
k3os-1374 [~]$ kubectl get csp
NAME                   ALLOCATED   FREE    CAPACITY   STATUS    TYPE      AGE
cstor-disk-pool-rgy3   270K        15.9G   15.9G      Healthy   striped   2m3s
cstor-disk-pool-gij4   270K        15.9G   15.9G      Healthy   striped   2m2s
cstor-disk-pool-09l1   270K        15.9G   15.9G      Healthy   striped   2m2s
All the pool instances should be healthy and each instance runs a pod which can be found by executing the following command.
k3os-1374 [~]$ kubectl get pods -n openebs -l app=cstor-pool
NAME                                    READY   STATUS    RESTARTS   AGE
cstor-disk-pool-rgy3-57f965b48c-srz2x   3/3     Running   0          8m33s
cstor-disk-pool-gij4-77bb4b8f44-s6k89   3/3     Running   0          8m33s
cstor-disk-pool-09l1-56d444996b-m698h   3/3     Running   0          8m33s
After creating cStor pool, we can proceed to create volume. For illustration, let us deploy a busybox with cstor volume as its persistent storage. Before creating a pool, we need to create a storage class specifying the storagePoolClaim that was created in the above step as follows:
apiVersion: storage.k8s.io/v1
kind: StorageClass
metadata:
  name: openebs-cstor
  annotations:
    openebs.io/cas-type: cstor
    cas.openebs.io/config: |
      - name: StoragePoolClaim
        value: "cstor-disk-pool"
      - name: ReplicaCount
        value: "3"
provisioner: openebs.io/provisioner-iscsi
Populate storagePoolClaim and ReplicaCount as per your requirement in the above definition and create storage class. You have to use this storage class while creating PVC.
kind: PersistentVolumeClaim
apiVersion: v1
metadata:
  name: openebs-pvc
spec:
  storageClassName: openebs-cstor
  accessModes:
    - ReadWriteOnce
  resources:
    requests:
      storage: 10Gi
---
apiVersion: v1
kind: Service
metadata:
  labels:
    name: busybox
  name: busybox
spec:
  clusterIP: None
  selector:
    app: busybox
---
apiVersion: apps/v1
kind: Deployment
metadata:
  name: busybox
  labels:
    app: busybox
spec:
  selector:
    matchLabels:
      app: busybox
  template:
    metadata:
      labels:
        app: busybox
    spec:
      containers:
      - name: app-busybox
        imagePullPolicy: IfNotPresent
        image: busybox
        command: ["/bin/sh"]
        args: ["-c", "while true; do sleep 10;done"]
        env:
        volumeMounts:
        - name: data-vol
          mountPath: /busybox
      volumes:
      - name: data-vol
        persistentVolumeClaim:
          claimName: openebs-pvc
After updating the storage class in the above manifest, let us deploy the busybox application by applying the above definition.
Check if the PVC is created and mounted successfully on the application pod by checking their status.
k3os-1374 [~]$ kubectl get pvc
NAME          STATUS   VOLUME                                     CAPACITY   ACCESS MODES   STORAGECLASS    AGE
openebs-pvc   Bound    pvc-6cd2b30a-49ed-4605-b1e0-dd23c45e548d   10Gi       RWO            openebs-cstor   4m35s

k3os-1374 [~]$ kubectl get pods
NAME                       READY   STATUS    RESTARTS   AGE
busybox-748fb77c75-9lwzz   1/1     Running   0          4m42s
As we specified ReplicaCount as 3 in the storage class, 3 volume replicas will be created which can be found by executing the following command.
k3os-1374 [~]$ kubectl get cvr -n openebs
NAME                                                            USED    ALLOCATED   STATUS    AGE
pvc-6cd2b30a-49ed-4605-b1e0-dd23c45e548d-cstor-disk-pool-09l1   7.95M   116K        Healthy   6m37s
pvc-6cd2b30a-49ed-4605-b1e0-dd23c45e548d-cstor-disk-pool-rgy3   7.95M   116K        Healthy   6m37s
pvc-6cd2b30a-49ed-4605-b1e0-dd23c45e548d-cstor-disk-pool-gij4   7.95M   116K        Healthy   6m37s
Thus, the cStor engine can be used to provision persistent volume for the workloads in K3s.
Please leave your valuable comments or feedback in the comment section below if you find this tutorial helpful.


Game changer in Container and Storage Paradigm- MayaData gets acquired by DataCore Software
Don Williams
Don Williams
Managing Ephemeral Storage on Kubernetes with OpenEBS
Kiran Mova
Kiran Mova
Understanding Persistent Volumes and PVCs in Kubernetes & OpenEBS
Murat Karslioglu
Murat Karslioglu