
.jpg)
If you are currently using Google Cloud for your Kubernetes needs, it is more than likely that you are using Google’s Kubernetes service, GKE. The good news is that you have another option for persistent storage apart from Google Persistent Disks, or GPDs.
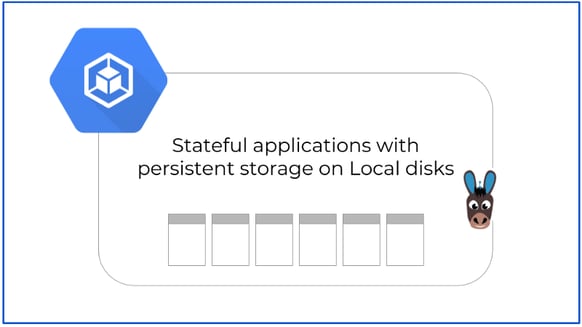
Local disks as persistent storage on GKE using OpenEBS
With OpenEBS software, you can easily set up persistent storage using the Local SSDs of GKE instances.
. . .
In this blog post, we’ll discuss the advantages of using GKE Local SSDs instead of GPDs and how to set up persistent storage using OpenEBS for highly available storage volumes. Though GPDs are extremely easy to provision and natively integrated with GKE, there are some inconveniences with GPDs related to stateful applications.
Running Stateful Apps using GPD Volumes
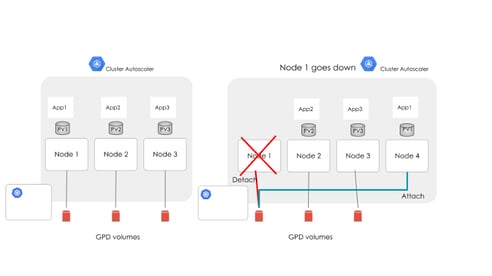
- When a GKE node goes down, a new node comes up as part of Cluster Autoscaler. GPD disks that are associated with the old node must be detached from the old node and attached to the new node. This must be done through a manual procedure. Even if automated detaching were available, it would still slow the system.
- Performance of the GPD volumes is limited as they are part of a larger shared storage network. GKE is not able to make use of faster disks such as SSDs.
- Slow fail-over essentially means no High Availability.
- Poor I/O, unless unused disk space is not an issue.
Restrictions for Using Local SSDs as -is for Kubernetes
Google cloud documentation on the restrictions for using local SSDs for Kubernetes is mentioned here.
Here is a quick reference summarizing the restrictions.
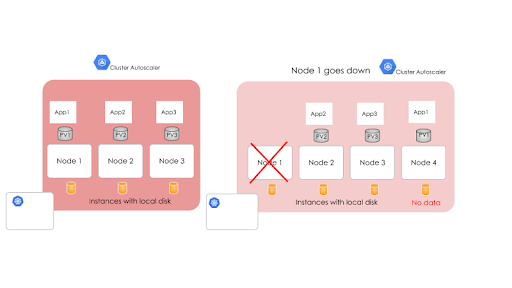
Because local SSDs are physically attached to the node’s host virtual machine instance, any data stored exists only on that node. Since the data stored on the disks is local, your application must accommodate for this data being unavailable.
Data stored on local SSDs are ephemeral. A Pod that writes to a local SSD might lose access to the data stored on the disk if the Pod is rescheduled away from that node. Additionally, if the node is terminated, upgraded, or repaired, the data will be erased.
Additionally, you cannot add local SSDs to an existing node pool.
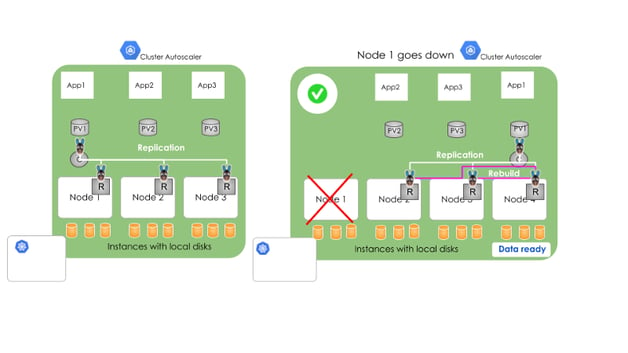
No Restrictions with OpenEBS on the Local SSDs of GKE
OpenEBS natively supports synchronous replication. This replication can be done when nodes (hence disks) are placed across Availability Zones (AZs).
Synchronous Replication of Data with OpenEBS
OpenEBS uses a minimum of three replicas to run OpenEBS clusters with high availability. If a node fails, OpenEBS will manage the data to be replicated to a new disk, which will come up as part of Cluster Autoscaler. In the meantime, your workload stems from accessing the live data from one of the replicas.
Quick Steps to Set Up OpenEBS on GKE
- Set up a three-node GKE cluster with local disks by enabling the Cluster Autoscaler feature.
- Install OpenEBS on Kubernetes Nodes. This should be simple, and a couple of methods are discussed at the beginning of our docs, using either a Helm Chart or directly from Kubectl. More details are mentioned in the OpenEBS documentation.
- Use OpenEBS Storage Classes to create Persistent Volumes for your stateful applications.
. . .
Detailed Explanation of OpenEBS 0.7 Cluster Deployment on GKE across AZs and Rebuilding of PVs.
Prerequisites
- GKE account with credentials to create instances using the local disk.
- Ubuntu 16.04
- gcloud CLI access
Creating a GKE Cluster
You can start by entering your login information to your Google Cloud Platform and create the GKE cluster as follows:
- Click “CREATE CLUSTER” from the console and fill in the required details.
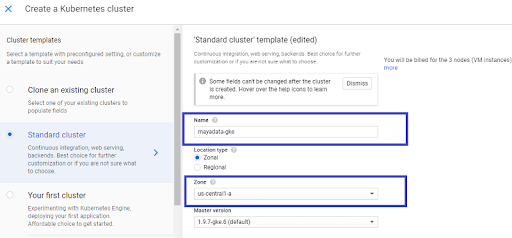
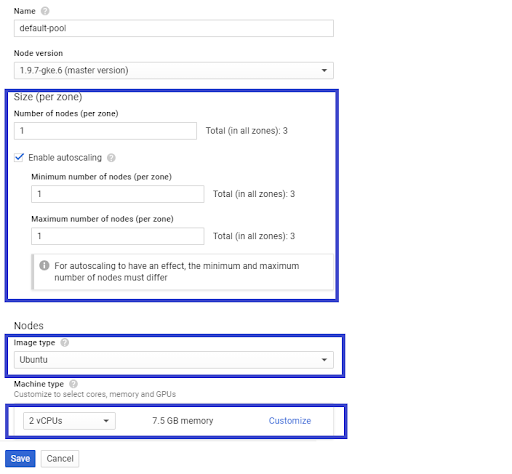
- Click “Advanced Edit” under the Node Pool section and Enable the “Auto Scaling” feature for the cluster. Select the Node Image type as “Ubuntu.”
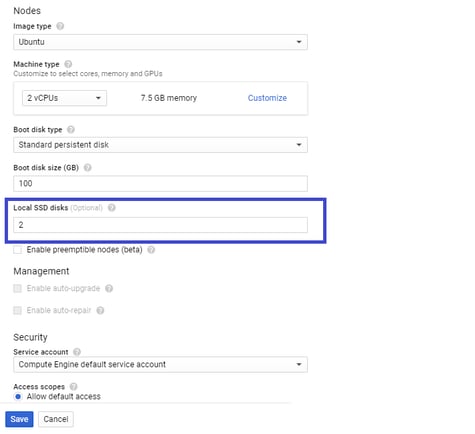
- Add the required number of local SSD disks per Node as follows and save the changes.
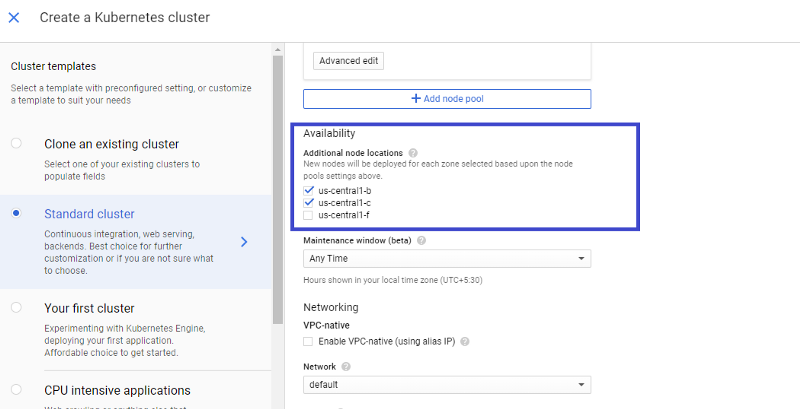
4. We have deployed the cluster across different AZs. For high availability, and in case one zone goes down, the data and application would remain intact. You can select the required zones by clicking on “Advanced options”. I have chosen the following zones rather than my default zone.
5. Now you can create your K8s cluster by clicking the “Create” button.
6. Check your Kubernetes Cluster status under the “Kubernetes Clusters” section.
7. Once your cluster is ready, launch the gcloud shell to access your cluster using CLI.
8. You may need an admin-context if you are installing OpenEBS without Helm. Use the following command to set the admin-context:
kubectl create clusterrolebinding <clustername>-cluster-admin-binding --clusterrole=cluster-admin --user=<myusername>9. Before installing OpenEBS, you will need to select one of the mounted SSD disks to create an OpenEBS Storage Pool. You must note the mount path of the selected disk, as we need to provide the mount path details while creating the storage pool.
In my cases, I have chosen two local SSDs per node, and it is mounted automatically on the Node as part of the instance creation. Among these disks, I will choose the “sdb” disk. The OpenEBS Jiva storage pool will be created on the “sdb” disk on each node. Steps for creating pools are mentioned below.
You can obtain the mounted disk details on Nodes using the following command:
sudo lsblk -o NAME,FSTYPE,SIZE,MOUNTPOINT,LABELBelow is an example output.
NAME FSTYPE SIZE MOUNTPOINT LABEL

sdb ext4 375G /mnt/disks/ssd0

sdc ext4 375G /mnt/disks/ssd1

sda 100G

└─sda1 ext4 100G / cloudimg-rootfs
10. You are now ready to install the OpenEBS 0.7 cluster using the following command. Then follow the steps below from your master node.
kubectl apply -fhttps://openebs.github.io/charts/openebs-operator-0.7.0.yaml
11. You can check the OpenEBS running pod details using the following command:
kubectl get pods -n openebsBelow is an example output:
NAME READY STATUS RESTARTS AGE

cstor-sparse-pool-9stx-5b6556cc54–4q249 2/2 Running 0 22s

cstor-sparse-pool-ew8c-54bd645b6c-6s2d5 2/2 Running 0 22s

cstor-sparse-pool-fml8–8685fbbc74-dg4fs 2/2 Running 0 22s

maya-apiserver-85657db5cf-b7sr9 1/1 Running 0 1m

openebs-ndm-857lr 1/1 Running 0 57s

openebs-ndm-gpxh6 1/1 Running 0 57s

openebs-ndm-tjmhg 1/1 Running 0 57s

openebs-provisioner-7594dbf8cd-ph8jn 1/1 Running 0 59s

openebs-snapshot-operator-7dddbf56db-7xtct 2/2 Running 0 58s
12. You can then check the default storage classes created as part of the OpenEBS operator installation using the following command:
kubectl get scAgain, here is an example output:
NAME PROVISIONER AGE

openebs-cstor-sparse openebs.io/provisioner-iscsi 1h

openebs-jiva-default openebs.io/provisioner-iscsi 1h

openebs-snapshot-promoter volumesnapshot.external-storage.k8s.io/snapshot-promoter 1h

standard (default) kubernetes.io/gce-pd 1h
13. Create a storage pool on an external disk mounted on the nodes. In step 8, I mentioned using the “sdb” disk for creating an OpenEBS storage Pool. To create a storage pool, create a file called “openebs-config.yaml” in your master node and add the example YAML (shown below) while changing the appropriate mounted disk path.
For example, if your external disk is mounted as /mnt/disks/ssd0 in your nodes, change the path as shown below.
path: “/mnt/disks/ssd0”Example yaml file:
---

apiVersion: openebs.io/v1alpha1

kind: StoragePool

metadata:

name: default

type: hostdir

spec:

path: "/mnt/disks/ssd0"

---
14. Apply the modified openebs-config.yaml file by using the following command:
kubectl apply -f openebs-config.yamlThis will create a storage pool called “default” on the selected disk.
15. The storage pool is now created on the Nodes according to your requirement. You can now get the storage pool details by running the following command:
kubectl get spExample output:
NAME AGE

cstor-sparse-pool-9stx 1h

cstor-sparse-pool-ew8c 1h

cstor-sparse-pool-fml8 1h

default 1h
16. Now your configured OpenEBS Jiva storage engine will create an OpenEBS Jiva volume on the storage pool established on your local SSD disk.
17. Deploy your application YAML, which will be consumed in the OpenEBS Jiva volume.
We now have the Percona deployment application YAML and need to change the storage class mentioned in the YAML with the default storage class name “openebs-jiva-default” for the Jiva volume. This will be created as part of the openebs-operator.yaml installation.
18. We now use the following Percona deployment YAML file to deploy a stateful Percona application using the Jiva volume. Obtain the YAML file using following command:
wget
https://raw.githubusercontent.com/openebs/openebs/master/k8s/demo/percona/percona-openebs-deployment.yaml
19. Edit the downloaded “percona-openebs-deployment.yaml” and conduct the following changes.
In the “PersistentVolumeClaim” section , under metadata, add the following content.
labels:

“volumeprovisioner.mapi.openebs.io/replica-topology-key-domain”: “failure-domain.beta.kubernetes.io”

“volumeprovisioner.mapi.openebs.io/replica-topology-key-type”: “zone”
Now change the “storageClassName” from ” openebs-standard” to “openebs-jiva-default.”
20. Save the modified changes and apply the YAML as follows. This will create a PVC and PV in the mentioned size.
kubectl apply -f percona-openebs-deployment.yaml21. You can then view the PVC status by running the following command:
kubectl get pvcBelow is an example output.
NAME STATUS VOLUME CAPACITY ACCESS MODES STORAGECLASS AGE

demo-vol1-claim Bound default-demo-vol1-claim-2300073071 5G RWO openebs-jiva-default 11m
22. You can then obtain the PV status by running the following command:
kubectl get pvAnd here is an example output.
NAME CAPACITY ACCESS MODES RECLAIM POLICY STATUS CLAIM STORAGECLASS REASON AGE

default-demo-vol1-claim-2300073071 5G RWO Delete Bound default/demo-vol1-claim openebs-jiva-default
23. Now, your Percona application pod will be running along with three Jiva volume replicas and one Jiva Controller pod. You can view the running pod status by running the following command:
kubectl get pods -o wideWhich will provide the following output.
NAME READY STATUS RESTARTS AGE IP NODE

default-demo-vol1-claim-2300073071-ctrl-78d4fbc66d-v4454 2/2 Running 0 14m 10.44.2.9 gke-mayadata-gke-default-pool-2d42a511-7gcz

default-demo-vol1-claim-2300073071-rep-79f97d5494-cvd8z 1/1 Running 0 14m 10.44.0.8 gke-mayadata-gke-default-pool-5eed8925-7391

default-demo-vol1-claim-2300073071-rep-79f97d5494-g2hff 1/1 Running 0 14m 10.44.1.8 gke-mayadata-gke-default-pool-54c3be93-qsgl

default-demo-vol1-claim-2300073071-rep-79f97d5494-qqvv4 1/1 Running 0 14m 10.44.2.10 gke-mayadata-gke-default-pool-2d42a511-7gcz

percona-7f6bff67f6-mjp9d 1/1 Running 0 14m 10.44.1.9 gke-mayadata-gke-default-pool-54c3be93-qsgl
Summary
 OpenEBS on GKE
Local SSDs on your GKE cluster can be used as persistent storage for stateful applications such as Prometheus, WordPress, MongoDB etc. This gives you the advantages of both the low latency local SSD use and fault-tolerant architecture ensured by OpenEBS.
Thank you for reading. Feel free to join our Slack channel for any questions or help needed, or to share your success stories of using OpenEBS on GKE.
This article was first published on Oct 7, 2018 on OpenEBS's Medium Account


Game changer in Container and Storage Paradigm- MayaData gets acquired by DataCore Software
Don Williams
Don Williams
Managing Ephemeral Storage on Kubernetes with OpenEBS
Kiran Mova
Kiran Mova
Understanding Persistent Volumes and PVCs in Kubernetes & OpenEBS
Murat Karslioglu
Murat Karslioglu