

LUKS: Introduction
LUKS (Linux Unified Key Setup) is a disk encryption methodology and was mainly intended for Linux distributions. Using LUKS, almost everything on the disk is encrypted and can be decrypted using a unique password.
LUKS encrypted devices can also be used to create OpenEBS cStor volumes. This guide will give an overview of how we can use encryption features for OpenEBS cStor volumes.
Below are the steps to provide encrypted OpenEBS cStor volume capacity running on OpenEBS version 1.9 and above. We will be doing a data backup and restore using Kubera’s DMaaS feature, where data from non-encrypted to encrypted volume will be migrated.
Instructions and Pre-requisite:
For performing the migration from non-encrypted to encrypted volumes in Kubera using DMaaS, we need to make sure that we have :
- A cluster connected to Kubera with non-encrypted volumes. For more details, refer to Getting started with Kubera article.
To perform the migration, follow the below-mentioned steps:
Step1: Create a new K8S cluster where the LUKS will be used to get encrypted volumes
Step2: Make sure to add an additional block device to each node, which LUKS will use for encryption. In our case, we have used a Kubernetes cluster hosted on VMware with an additional 50GB block devices added to each node.
Device-name = sdb
~ > lsblk
NAME   MAJ:MIN RM   SIZE RO TYPE MOUNTPOINT
fd0      2:0    1     4K  0 disk
loop0    7:0    0   956K  1 loop /snap/gnome-logs/81
loop1    7:1    0  44.9M  1 loop /snap/gtk-common-themes/1440
loop2    7:2    0    97M  1 loop /snap/core/9665
loop3    7:3    0    55M  1 loop /snap/core18/1880
loop4    7:4    0   4.2M  1 loop /snap/gnome-calculator/544
loop5    7:5    0   2.2M  1 loop /snap/gnome-system-monitor/148
loop6    7:6    0  54.7M  1 loop /snap/core18/1668
loop7    7:7    0 161.4M  1 loop /snap/gnome-3-28-1804/128
loop8    7:8    0   2.4M  1 loop /snap/gnome-calculator/748
loop9    7:9    0 255.6M  1 loop /snap/gnome-3-34-1804/36
loop10   7:10   0   956K  1 loop /snap/gnome-logs/100
loop11   7:11   0  14.8M  1 loop /snap/gnome-characters/399
loop12   7:12   0  89.1M  1 loop /snap/core/8268
loop13   7:13   0 160.2M  1 loop /snap/gnome-3-28-1804/116
loop14   7:14   0   3.7M  1 loop /snap/gnome-system-monitor/127
loop15   7:15   0  62.1M  1 loop /snap/gtk-common-themes/1506
loop16   7:16   0   276K  1 loop /snap/gnome-characters/550
sda      8:0    0   100G  0 disk
└─sda1   8:1    0   100G  0 part /
sdb      8:16   0    50G  0 disk
sr0     11:0    1  1024M  0 rom
~ >
~ > fdisk -l /dev/sdb
Disk /dev/sdb: 50 GiB, 53687091200 bytes, 104857600 sectors
Units: sectors of 1 * 512 = 512 bytes
Sector size (logical/physical): 512 bytes / 512 bytes
I/O size (minimum/optimal): 512 bytes / 512 bytesStep3: Make sure you install cryptsetup package on each node connected to the cluster.
For Ubuntu:
apt-get install cryptsetup
Centos/Redhat:
yum install cryptsetup
~ > apt-get install cryptsetup
Reading package lists... Done
Building dependency tree
Reading state information... Done
The following additional packages will be installed:
  cryptsetup-bin
Suggested packages:
  keyutils
The following NEW packages will be installed:
  cryptsetup cryptsetup-bin
0 upgraded, 2 newly installed, 0 to remove and 116 not upgraded.
Need to get 244 kB of archives.
After this operation, 828 kB of additional disk space will be used.
Do you want to continue? [Y/n] YStep4: Format the LUKS partition with a passphrase:
cryptsetup luksFormat /dev/<device_name>
~ > cryptsetup luksFormat /dev/sdb

WARNING!
========
This will overwrite data on /dev/sdb irrevocably.

Are you sure? (Type uppercase yes): YES
Enter passphrase for /dev/sdb:
Verify passphrase:
~ >Step5: Create a LUKS device mapping
Cryptsetup luksOpen </dev/device_name/> <mapping>
~ > cryptsetup luksOpen /dev/sdb backup
Enter passphrase for /dev/sdb:
~ >Step6: Confirm the new LUKS partition by running lsblk command. In our example, mapped as backup.
~ > lsblk
NAME     MAJ:MIN RM   SIZE RO TYPE  MOUNTPOINT
fd0        2:0    1     4K  0 disk
loop0      7:0    0   956K  1 loop  /snap/gnome-logs/81
loop1      7:1    0  44.9M  1 loop  /snap/gtk-common-themes/1440
loop2      7:2    0    97M  1 loop  /snap/core/9665
loop3      7:3    0    55M  1 loop  /snap/core18/1880
loop4      7:4    0   4.2M  1 loop  /snap/gnome-calculator/544
loop5      7:5    0   2.2M  1 loop  /snap/gnome-system-monitor/148
loop6      7:6    0  54.7M  1 loop  /snap/core18/1668
loop7      7:7    0 161.4M  1 loop  /snap/gnome-3-28-1804/128
loop8      7:8    0   2.4M  1 loop  /snap/gnome-calculator/748
loop9      7:9    0 255.6M  1 loop  /snap/gnome-3-34-1804/36
loop10     7:10   0   956K  1 loop  /snap/gnome-logs/100
loop11     7:11   0  14.8M  1 loop  /snap/gnome-characters/399
loop12     7:12   0  89.1M  1 loop  /snap/core/8268
loop13     7:13   0 160.2M  1 loop  /snap/gnome-3-28-1804/116
loop14     7:14   0   3.7M  1 loop  /snap/gnome-system-monitor/127
loop15     7:15   0  62.1M  1 loop  /snap/gtk-common-themes/1506
loop16     7:16   0   276K  1 loop  /snap/gnome-characters/550
sda        8:0    0   100G  0 disk
└─sda1     8:1    0   100G  0 part  /
sdb        8:16   0    50G  0 disk
└─backup 253:0    0    50G  0 crypt
sr0       11:0    1  1024M  0 rom
~ >Step7: Verify the status of the LUKS partition
cryptsetup -v status <mapping>
~ > cryptsetup -v status backup
/dev/mapper/backup is active.
  type:    LUKS1
  cipher:  aes-xts-plain64
  keysize: 256 bits
  key location: dm-crypt
  device:  /dev/sdb
  sector size:  512
  offset:  4096 sectors
  size:    104853504 sectors
  mode:    read/write
Command successful.
~ >Step8: Verify the status of the device-mapper file
blkid
~ > blkid
/dev/sda1: UUID="4c274704-27a2-4eb8-a9c5-2e04d45a85bb" TYPE="ext4" PARTUUID="75efceb3-01"
/dev/loop0: TYPE="squashfs"
/dev/loop1: TYPE="squashfs"
/dev/loop2: TYPE="squashfs"
/dev/loop3: TYPE="squashfs"
/dev/loop4: TYPE="squashfs"
/dev/loop5: TYPE="squashfs"
/dev/loop6: TYPE="squashfs"
/dev/loop7: TYPE="squashfs"
/dev/loop8: TYPE="squashfs"
/dev/sdb: UUID="0dd3366d-43ff-455d-b848-dc70713f30ce" TYPE="crypto_LUKS"
/dev/loop9: TYPE="squashfs"
/dev/loop10: TYPE="squashfs"
/dev/loop11: TYPE="squashfs"
/dev/loop12: TYPE="squashfs"
/dev/loop13: TYPE="squashfs"
/dev/loop14: TYPE="squashfs"
/dev/loop15: TYPE="squashfs"
/dev/loop16: TYPE="squashfs"
/dev/mapper/backup: LABEL="cstor-22fe12e0-f554-4f44-8c39-91e5211320ae" UUID="8650845353607662259" UUID_SUB="2557458019853633173" TYPE="zfs_member"
~ >Step9: Verify the status of the mapper file and the LUKS partition mapping:
~ > ls -lh /dev/mapper/
total 0
lrwxrwxrwx 1 root root       7 Jul 30 19:02 backup -> ../dm-0
crw------- 1 root root 10, 236 Jul 30 17:29 control
~ >Step10: Now, we are all set to connect this cluster with encrypted disks to Kubera. Please refer to Getting started with Kubera to know the detailed steps.
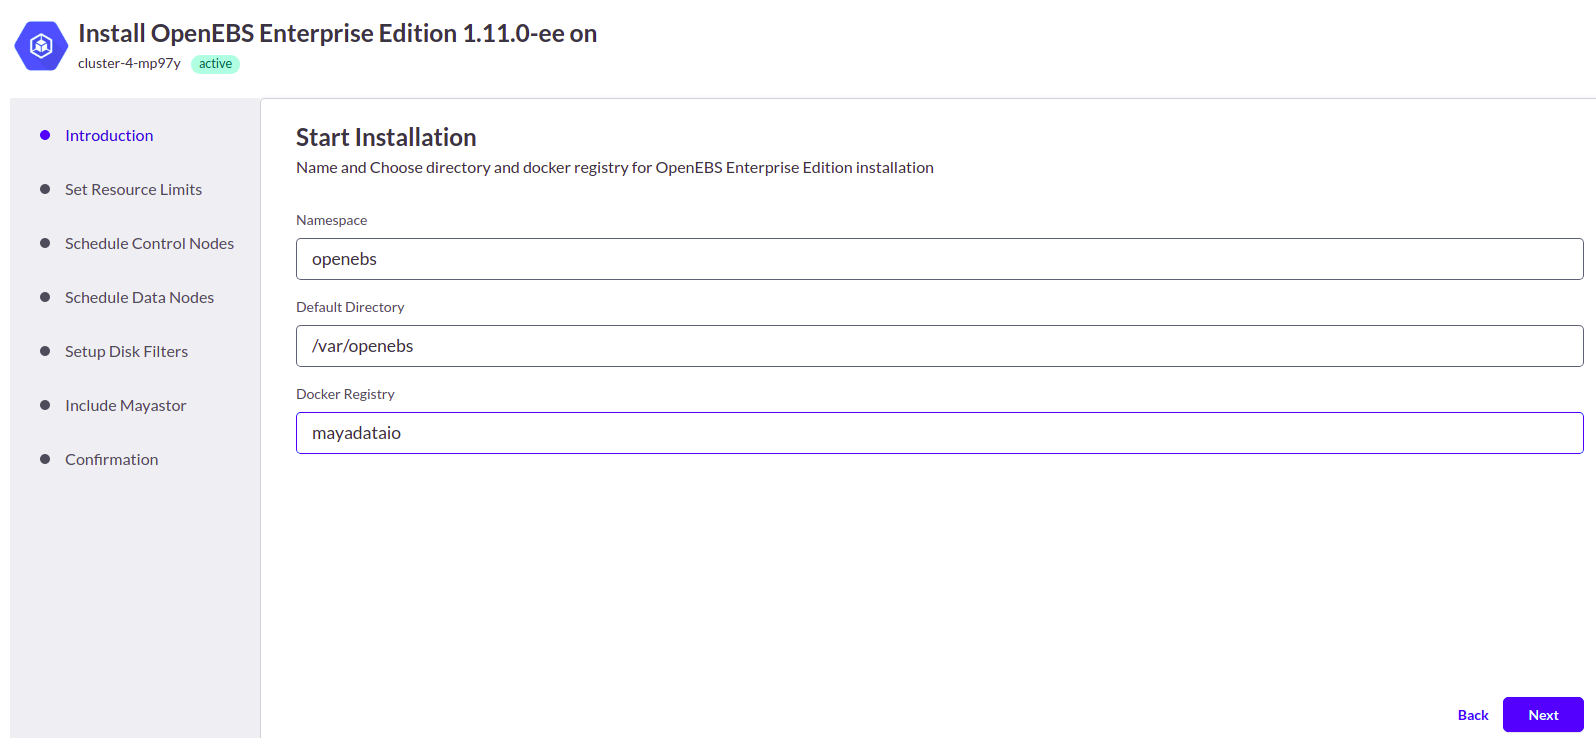
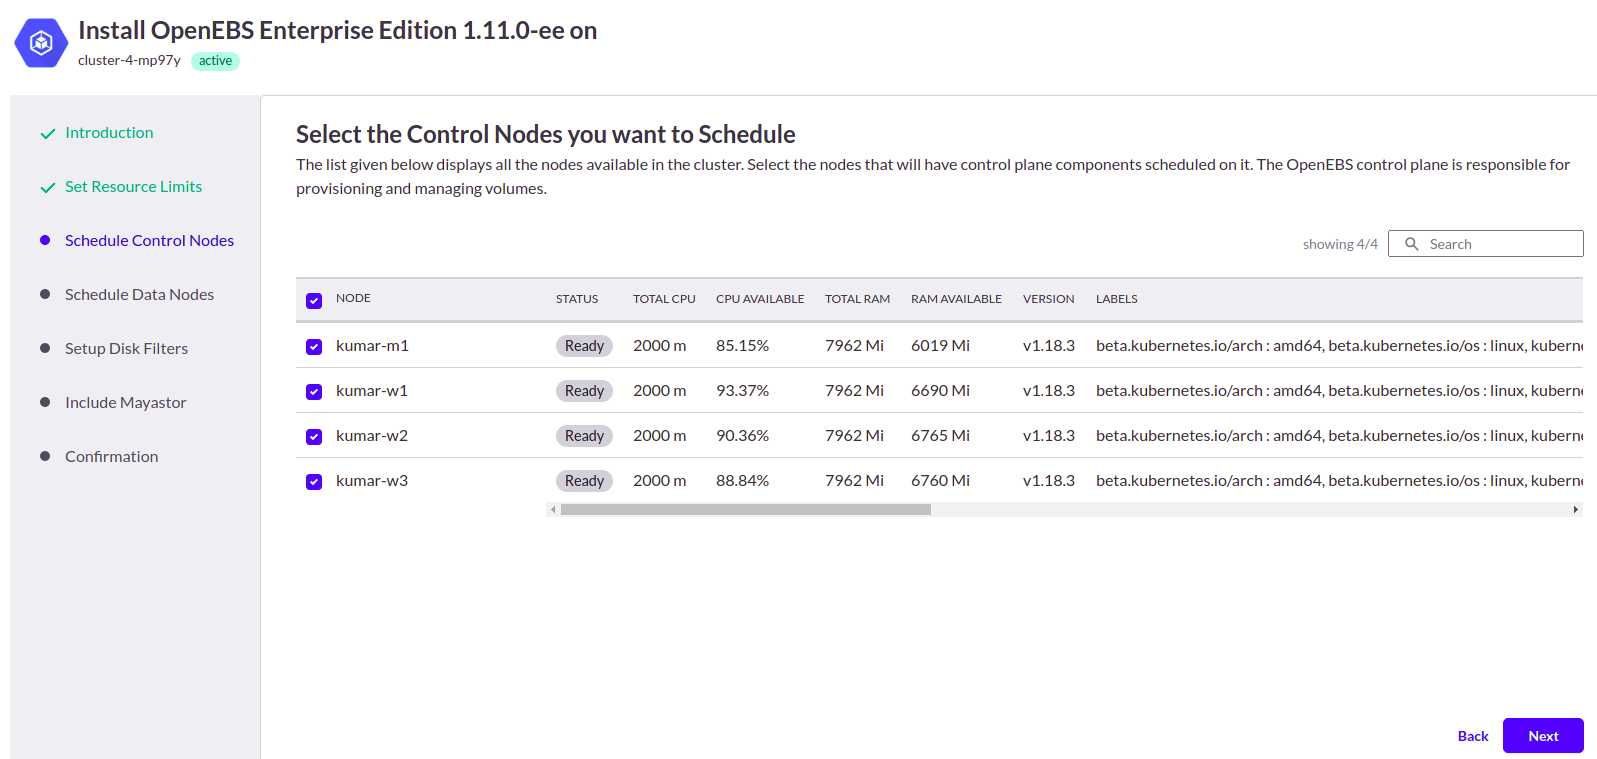
NOTE: While installing OpenEBS, make sure you make the below mentioned changes.
1.Select the Advanced installation for OpenEBS installation.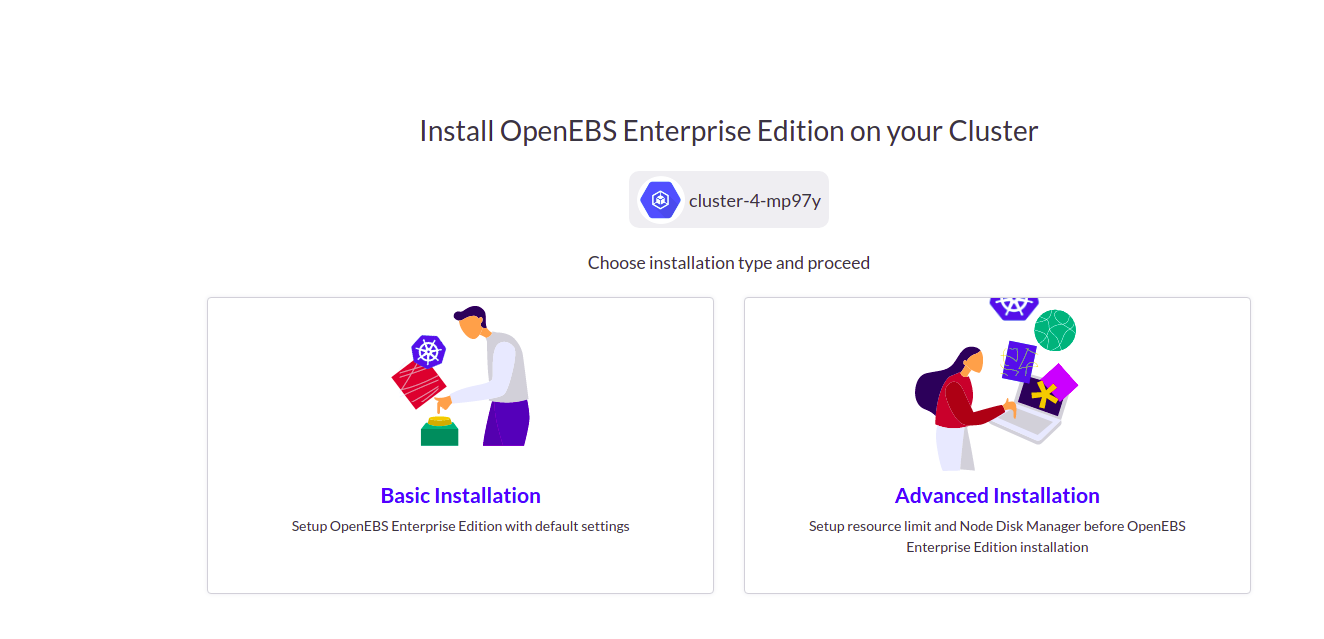
2. Specify the namespace, default directory, and docker registry.
3. Select the nodes where the control plane components have to be scheduled.
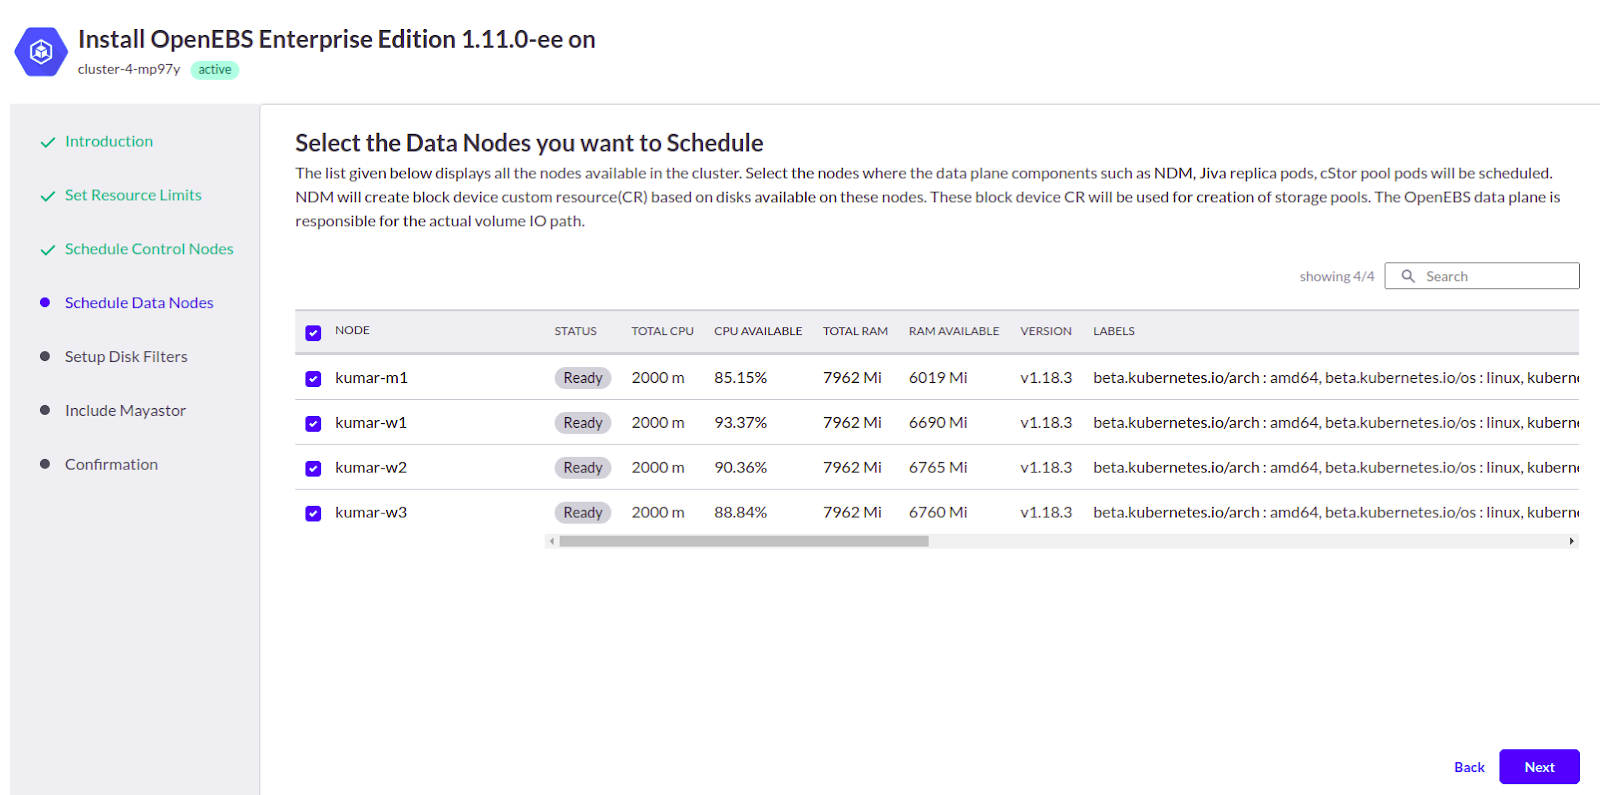
4. Select the nodes where the data plane components have to be scheduled.
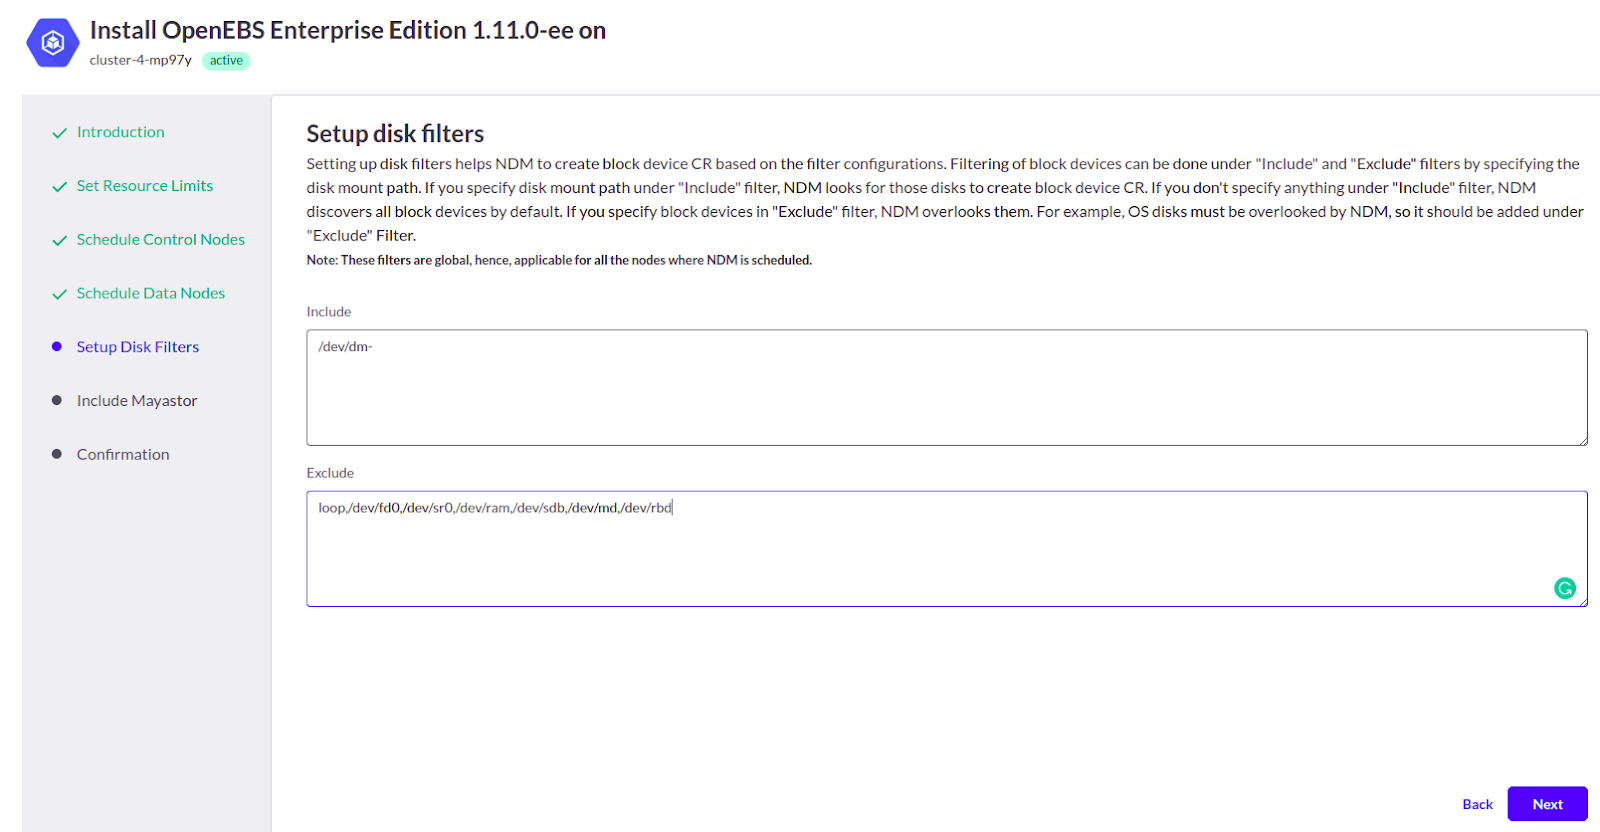
5. The next step is to setup disk filters. Under Include, add /dev/dm-, this ensures that NDM(Node Disk Manager) looks only for these disks to create block device CR.
Under Exclude, add the disks attached to nodes for LUKS utilization (refer Step 2). In our case, it was /dev/sdb
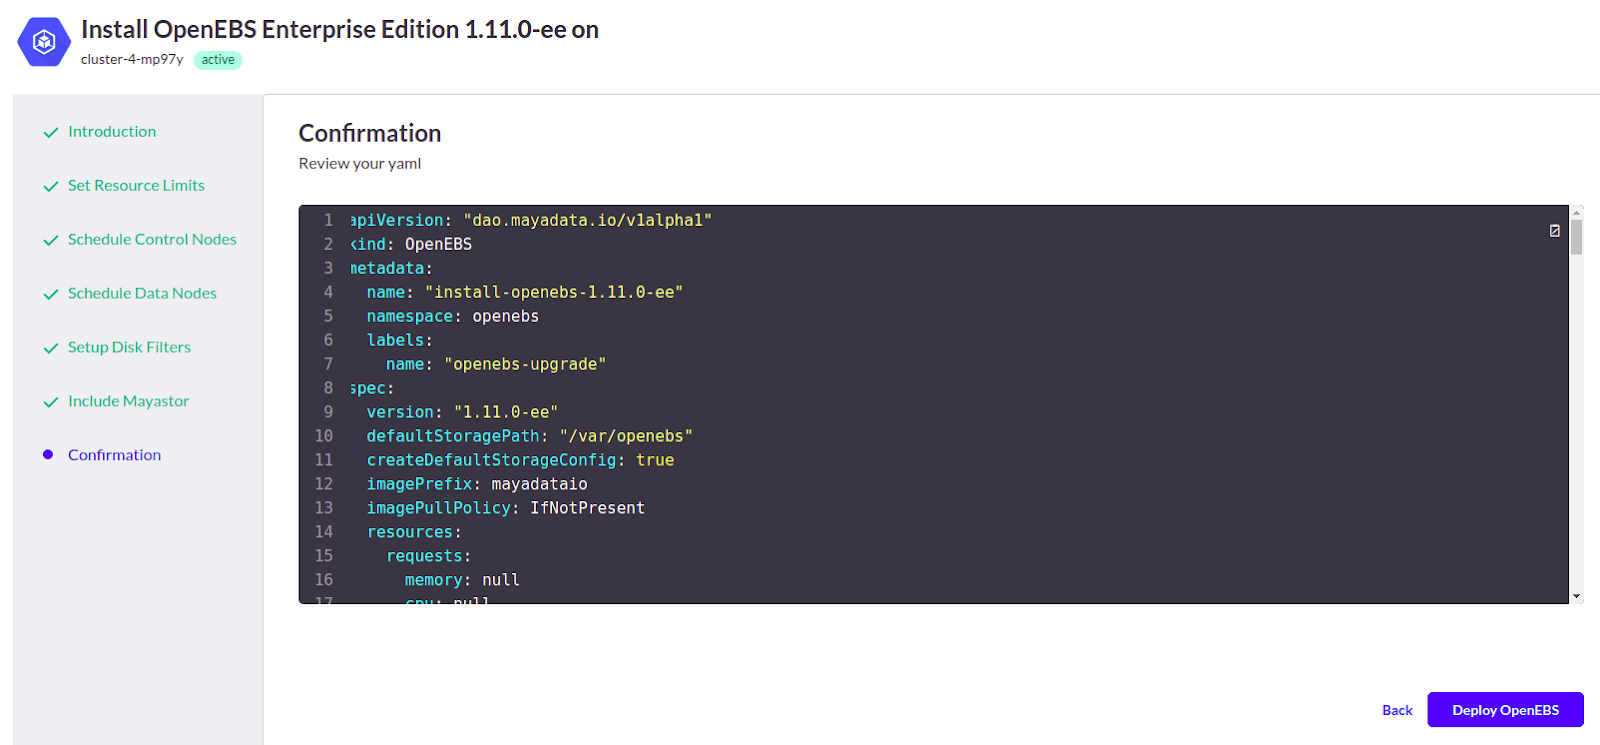
Next, click on Deploy OpenEBS.
Step11: Now, we need to create StoragePool, StorageClass, and PersistentVolumeClaim to be used:
kubectl get blockdevice -n openebs

The output will be similar to the following.

NAME                                           NODENAME                                    SIZE          CLAIMSTATE   STATUS   AGE
blockdevice-1c10eb1bb14c94f02a00373f2fa09b93   gke-ranjith-14-default-pool-da9e1336-mbq9   42949672960   Unclaimed    Active   2m39s
blockdevice-77f834edba45b03318d9de5b79af0734   gke-ranjith-14-default-pool-da9e1336-d9zq   42949672960   Unclaimed    Active   2m47s
blockdevice-936911c5c9b0218ed59e64009cc83c8f   gke-ranjith-14-default-pool-da9e1336-9j2w   42949672960   Unclaimed    Active   2m55s
Use the below YAML for storage pool creation from master node:
#Use the following YAMLs to create a cStor Storage Pool.
apiVersion: openebs.io/v1alpha1
kind: StoragePoolClaim
metadata:
  name: cstor-disk-pool
  annotations:
    cas.openebs.io/config: |
      - name: PoolResourceRequests
        value: |-
            memory: 2Gi
      - name: PoolResourceLimits
        value: |-
            memory: 4Gi
spec:
  name: cstor-disk-pool
  type: disk
  poolSpec:
    poolType: striped
  blockDevices:
    blockDeviceList:
    - blockdevice-1c10eb1bb14c94f02a00373f2fa09b93
    - blockdevice-77f834edba45b03318d9de5b79af0734
    - blockdevice-936911c5c9b0218ed59e64009cc83c8f
kubectl apply -f cstor-pool1-config.yaml
kubectl get spcThe following is an example output.
NAME              AGE
cstor-disk-pool   20s
Verify if cStor Pool is created successfully using the following command.
kubectl get cspThe following is an example output.
NAME                   ALLOCATED   FREE    CAPACITY   STATUS    TYPE      AGE
cstor-disk-pool-2gcb   270K        39.7G   39.8G      Healthy   striped   1m
cstor-disk-pool-9q2f   270K        39.7G   39.8G      Healthy   striped   1m
cstor-disk-pool-ilz1 270K 39.7G 39.8G Healthy striped 1mStep12: Creation of StorageClass. Use the below YAML for storageclass creation.
apiVersion: storage.k8s.io/v1
kind: StorageClass
metadata:
  name: openebs-sc-statefulset
  annotations:
    openebs.io/cas-type: cstor
    cas.openebs.io/config: |
      - name: StoragePoolClaim
        value: "cstor-disk-pool"
      - name: ReplicaCount
        value: "3"
provisioner: openebs.io/provisioner-iscsi
Kubectl get scStep13: Now we will use Kubera’s DMaaS feature for backup & restore of applications and its data. For using the DMaaS feature and getting it implemented, you can have a look at DMaaS.
DMaaS will help us migrate the application and its data from non-encrypted volumes in cluster-1 to encrypted volumes in cluster-2.
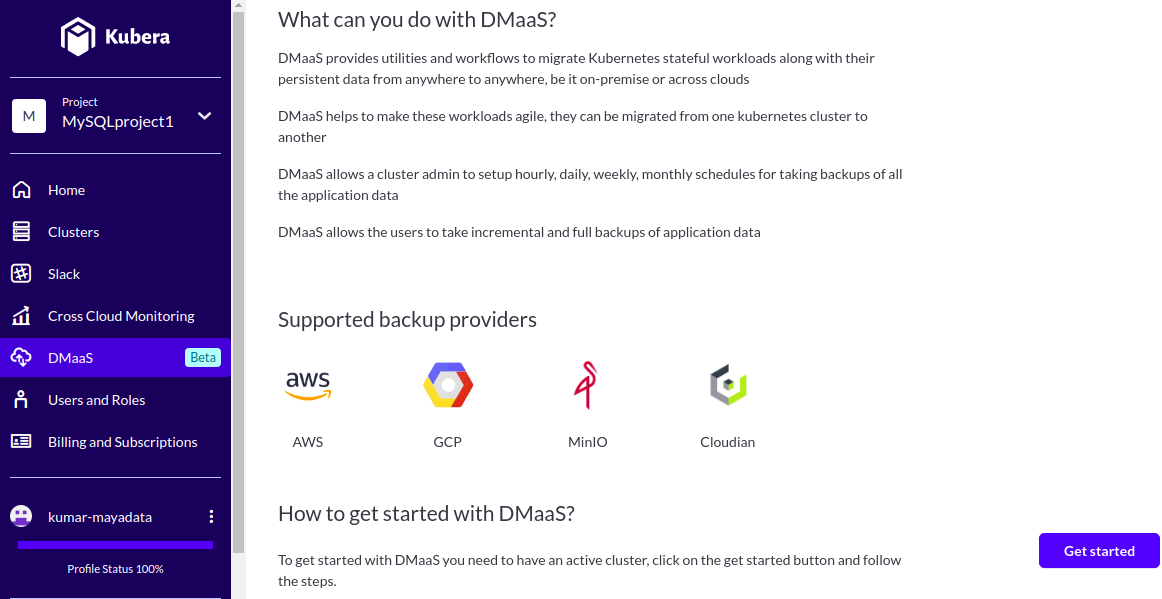
Step14: Once inside the Kubera UI, click on DMaaS -- > Get started
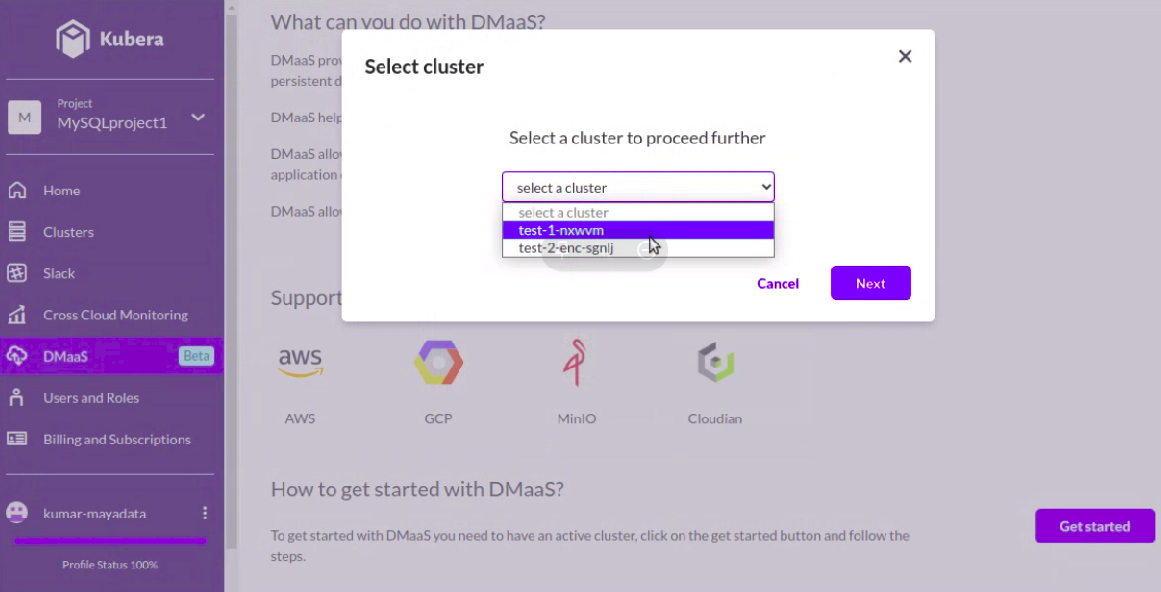
Step15: Click on “Select cluster” and select the source cluster which we need to backup
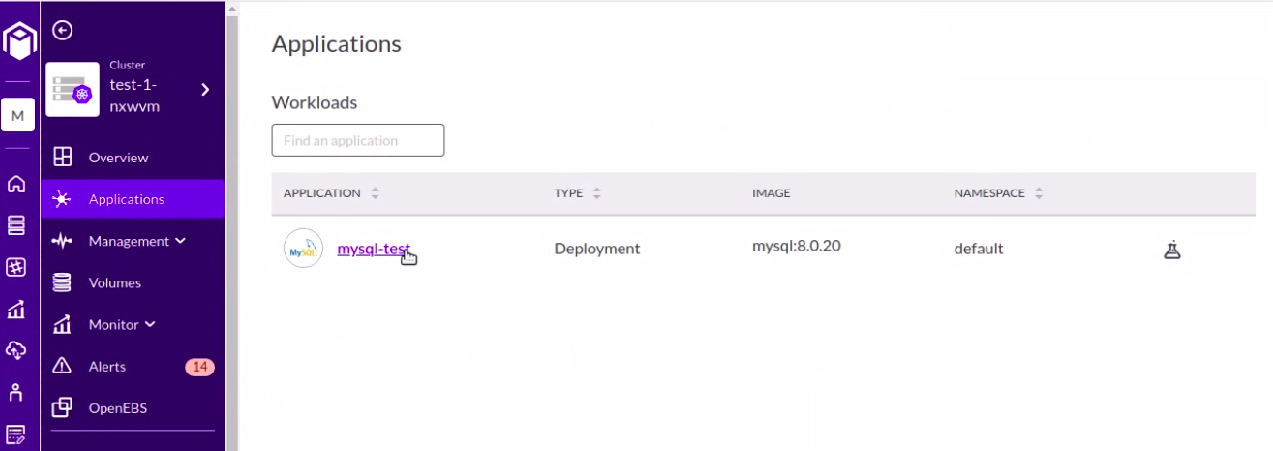
Step16: Select the application which we need to backup
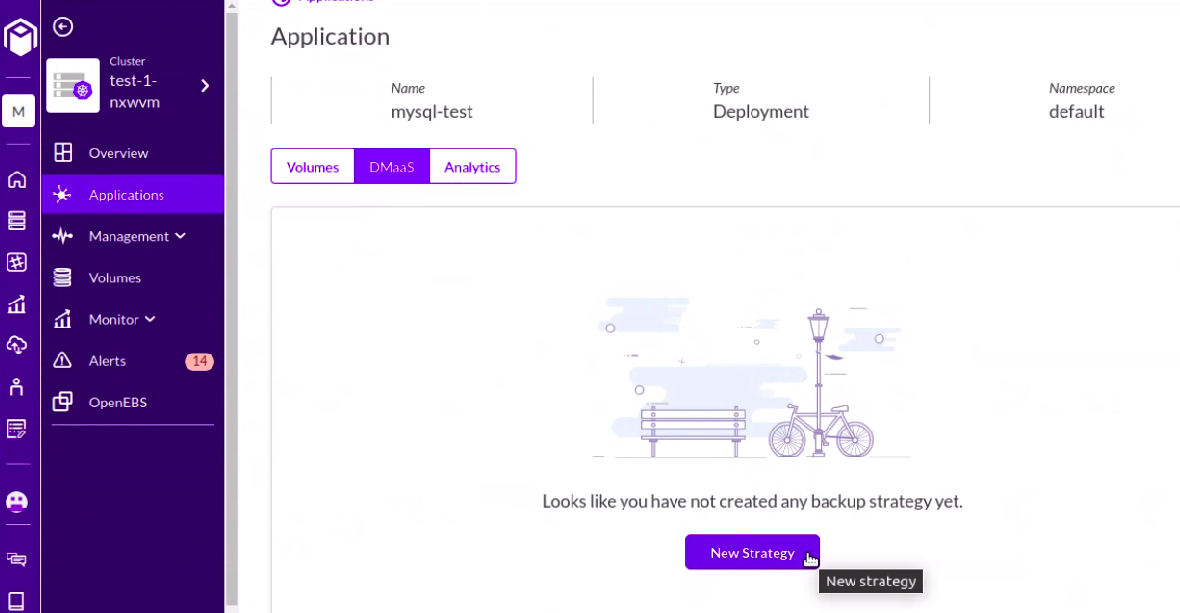
Step17: Click on DMaaS -- > New Strategy
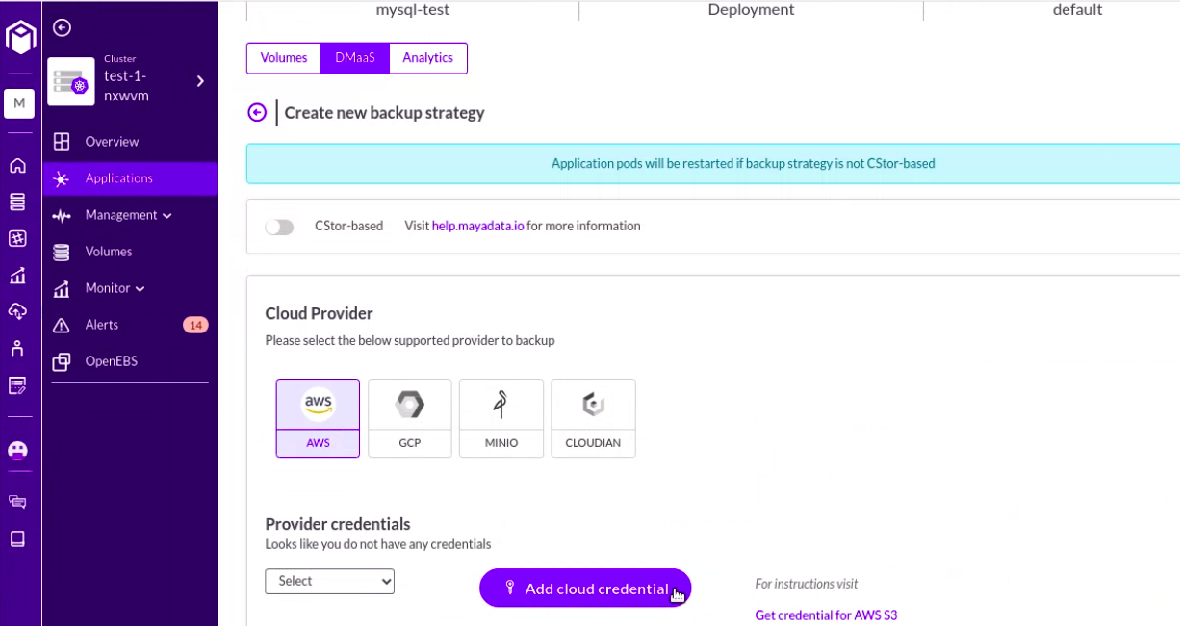
Step18: Create a new backup strategy and add cloud credentials where we will backup the application data. Please make sure to select the “cStor-based” tab and enable it.
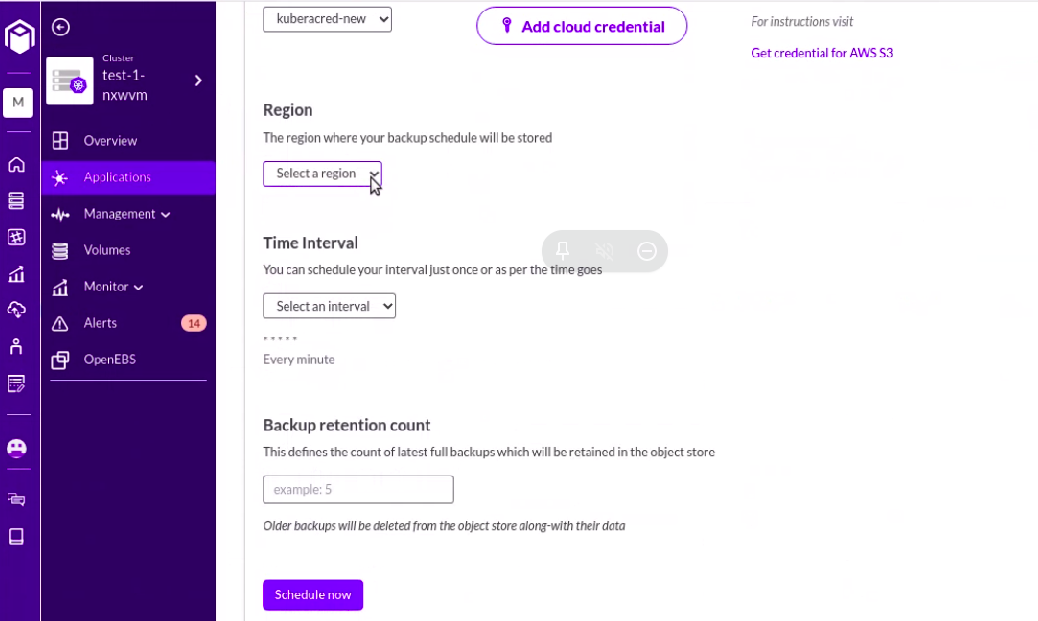
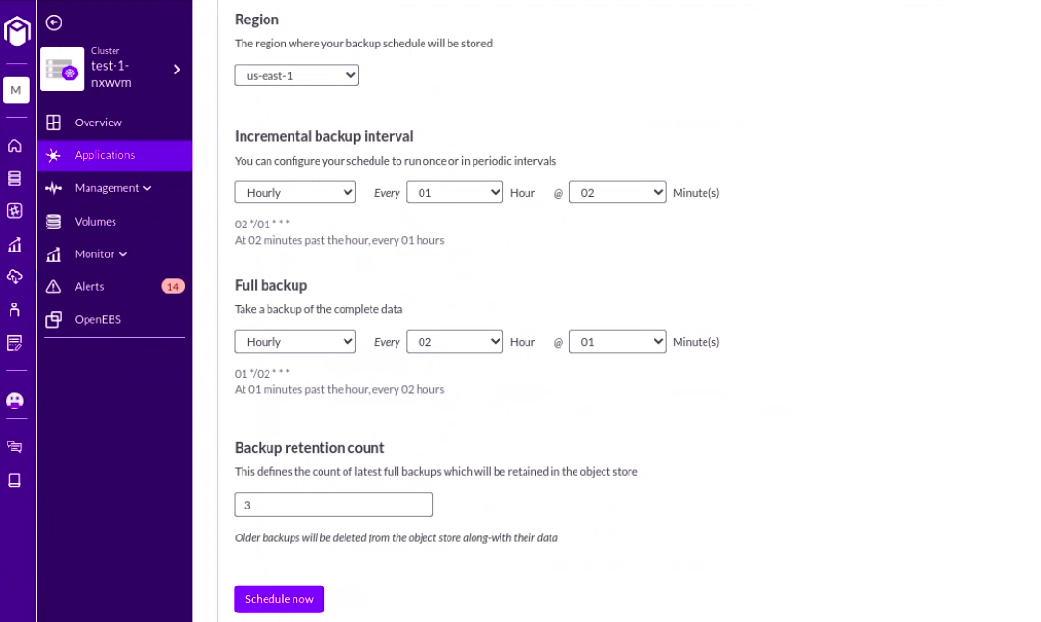
Step19: Select a region where we want to backup and set the time interval as per choice.
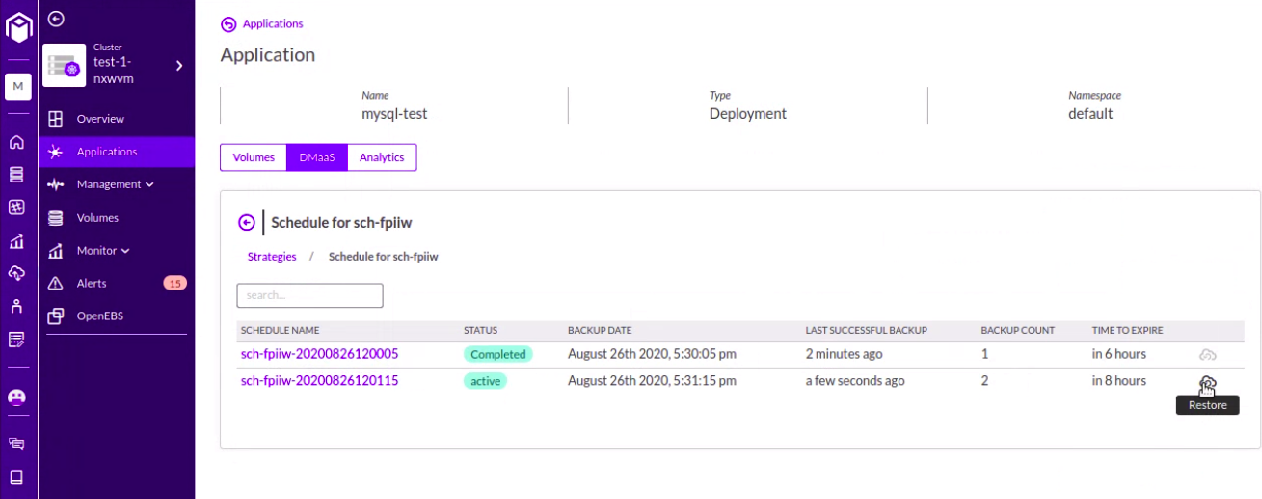
Step20: Select the Restore button by clicking on the backup from where we want to restore.
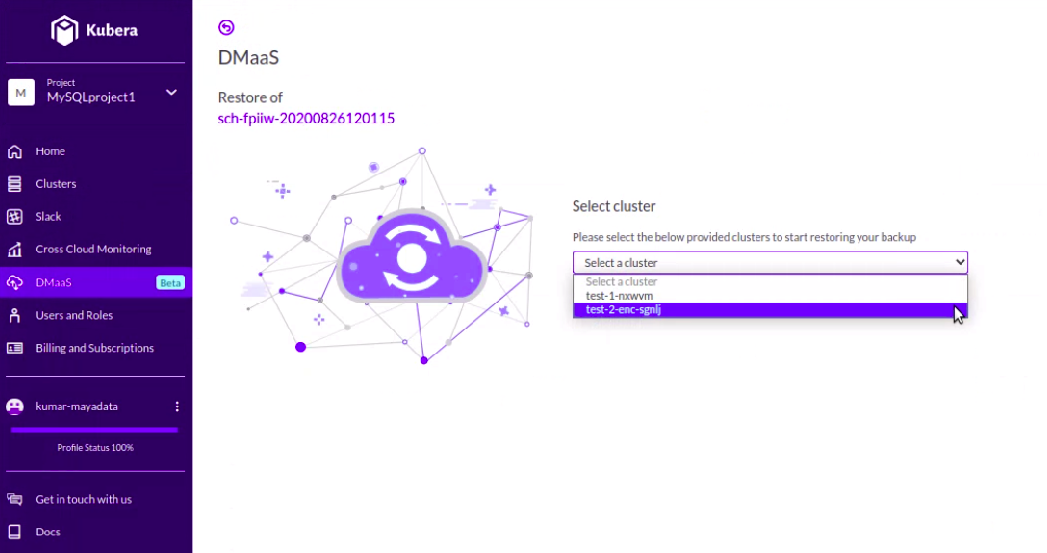
Step21: Select the destination cluster where we want to restore the application.
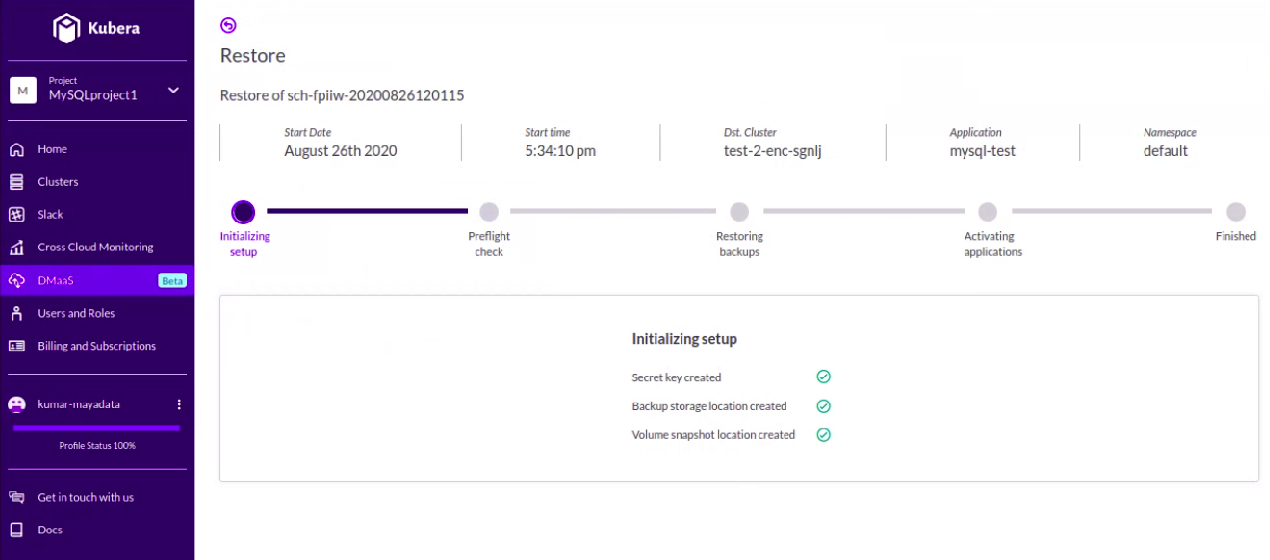
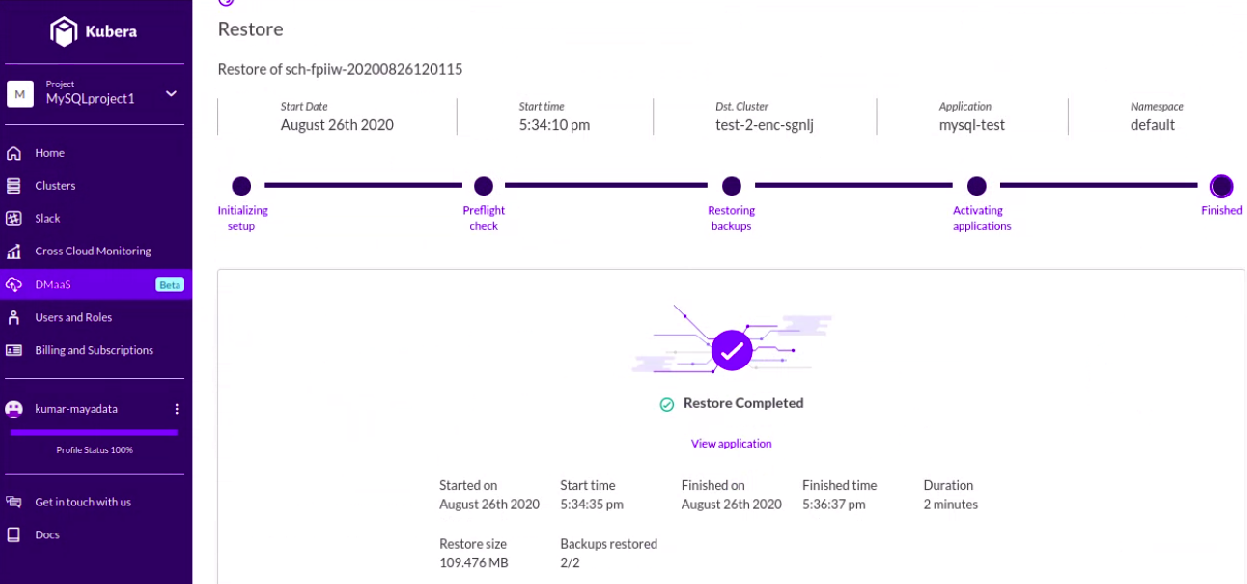
Step22: Finally, it will go in stages, and at last, the application will be restored. Log in to the destination cluster and try logging in to the application to verify integrity.
That's all for today. Hope you found the blog helpful. Do check our HelpCenter articles for more resources.


Game changer in Container and Storage Paradigm- MayaData gets acquired by DataCore Software
Don Williams
Don Williams
Managing Ephemeral Storage on Kubernetes with OpenEBS
Kiran Mova
Kiran Mova
Understanding Persistent Volumes and PVCs in Kubernetes & OpenEBS
Murat Karslioglu
Murat Karslioglu