


OpenEBS can be treated as a Cluster Add-on service, that can convert the existing Kubernetes Cluster into a full fledged Storage Controllers — that can serve Persistent Volumes to Stateful Workloads while making use of the storage attached to the nodes. Since OpenEBS runs in containers and has to access the underlying storage devices, it needs to run in Privileged mode.
So at a high level, to allow OpenEBS to run in privileged mode in SELinux=on nodes, the cluster should be configured to grant privileged access to OpenEBS service account.
Here are the steps I have followed:
Step 1: Setup appropriate security context for OpenEBS
On OpenShift Clusters: Select the right SCC for OpenEBS
OpenEBS like other cluster add-on services requires its pods to be executed with privileged access as it needs to directly access the block devices. However, this will not mean that SELinux should be turned off.
While running on OpenShift, we need to be aware of the security constraints available and to select the right security constraint for OpenEBS. There are 7 SCCs available.

To have OpenEBS pods running in privileged mode, add the OpenEBS service account (openebs-maya-operator) to use the privileged SCC; OpenShift will take care of setting the correct permissions (or SELinux labels) to make the container run in privileged mode. Sample commands to do this:
| oc adm policy add-scc-to-user privileged system:serviceaccount:openebs:openebs-maya-operator |
On CentOS/RHEL: Enable Pod Security Policies for OpenEBS
Create a file openebs-privileged-psp.yaml with the below spec.
apiVersion: extensions/v1beta1
kind: PodSecurityPolicy
metadata:
  name: openebs-privileged
  annotations:
    seccomp.security.alpha.kubernetes.io/allowedProfileNames: '*'
spec:
  privileged: true
  allowPrivilegeEscalation: true
  allowedCapabilities:
  - '*'
  volumes:
  - '*'
  hostNetwork: true
  hostPorts:
  - min: 0
    max: 65535
  hostIPC: true
  hostPID: true
  runAsUser:
    rule: 'RunAsAny'
  seLinux:
    rule: 'RunAsAny'
  supplementalGroups:
    rule: 'RunAsAny'
  fsGroup:
    rule: 'RunAsAny'
Then apply the YAML file
kubectl apply -f openebs-privileged-psp.yaml
Step 2: Install OpenEBS
Download the latest version of openebs-operator.yaml file.
wget https://openebs.github.io/charts/openebs-operator-0.8.2.yaml
On CentOS/RHEL: An extra step of adding PSP to the Cluster Role is required.
Edit the ClusterRole in the YAML to add openebs-privileged PSP
# Define Role that allows operations on K8s pods/deployments
kind: ClusterRole
apiVersion: rbac.authorization.k8s.io/v1beta1
metadata:
  name: openebs-maya-operator
rules:
- apiGroups: ["*"]
  resources: ["nodes", "nodes/proxy"]
  verbs: ["*"]
- apiGroups: ["*"]
  resources: ["namespaces", "services", "pods", "deployments", "events", "endpoints", "configmaps", "jobs"]
  verbs: ["*"]
- apiGroups: ["*"]
  resources: ["storageclasses", "persistentvolumeclaims", "persistentvolumes"]
  verbs: ["*"]
- apiGroups: ["volumesnapshot.external-storage.k8s.io"]
  resources: ["volumesnapshots", "volumesnapshotdatas"]
  verbs: ["get", "list", "watch", "create", "update", "patch", "delete"]
- apiGroups: ["apiextensions.k8s.io"]
  resources: ["customresourcedefinitions"]
  verbs: [ "get", "list", "create", "update", "delete"]
- apiGroups: ["*"]
  resources: [ "disks"]
  verbs: ["*" ]
- apiGroups: ["*"]
  resources: [ "storagepoolclaims", "storagepools"]
  verbs: ["*" ]
- apiGroups: ["*"]
  resources: [ "castemplates", "runtasks"]
  verbs: ["*" ]
- apiGroups: ["*"]
  resources: [ "cstorpools", "cstorvolumereplicas", "cstorvolumes"]
  verbs: ["*" ]
- apiGroups: ['extensions']
  resources: ['podsecuritypolicies']
  verbs:     ['use']
  resourceNames:
  - openebs-privileged
- nonResourceURLs: ["/metrics"]
  verbs: ["get"]
Install OpenEBS
kubectl apply -f openebs-operator-0.8.2.yaml
Note: If you are using helm to install openebs, you will need to apply the above change after it has been installed. In a future release of the helm chart, I will work on making this configurable parameter.
Step 3: (Optional) Create a new cStor Pool.
You can skip this step if using the default cStor Sparse pool.
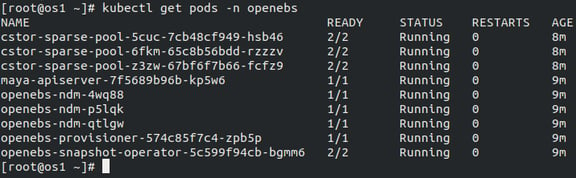
Step 3a: Verify all pods are working and cStor Pools are running
Step 3b: Verify that disks available on the nodes are discovered.
kubectl get disks
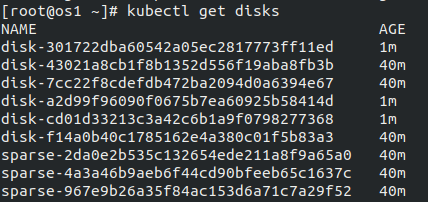 Disks detected by NDM, along with sparse disks
Step 3c: Create a storage pool claim using the instructions at https://docs.openebs.io/docs/next/configurepools.html
Create a cstor-pool-config.yaml as mentioned in the docs.
apiVersion: openebs.io/v1alpha1
kind: StoragePoolClaim
metadata:
  name: cstor-pool1
  annotations:
    cas.openebs.io/config: |
      - name: PoolResourceRequests
        value: |-
            memory: 1Gi
      - name: PoolResourceLimits
        value: |-
            memory: 2Gi
spec:
  name: cstor-pool1
  type: disk
  maxPools: 3
  poolSpec:
    poolType: striped
  disks:
    diskList:
    - disk-301722dba60542a05ec2817773ff11ed
    - disk-a2d99f96090f0675b7ea60925b58414d
    - disk-cd01d33213c3a42c6b1a9f0798277368
Apply this file kubectl apply -f cstor-pool-config.yaml
 3 cStor pool pods will be running
Step 3d: Create a new storage class using SPC as cstor-pool1 or edit the default storage class to use the newly created SPC. I have edited the already available default storageclass.
Step 4: Running Percona Application
wget https://raw.githubusercontent.com/openebs/openebs/master/k8s/demo/percona/percona-openebs-cstor-sparse-deployment.yaml
Edit the file to remove security context from the percona deployment.
Apply the yaml file
kubectl apply -f percona-openebs-cstor-sparse-deployment.yaml

The percona-cstor pod will be up and running.
Thanks for reading my blog! We continue to look for feedback and suggestions on how we can improve OpenEBS integration with all possible platforms and workloads. If you have any feedback on my blog or see any area of improvement with OpenEBS in general, please provide feedback below or find us on Twitter or on the OpenEBS slack community. http://slack.openebs.io
This article was first published on May 10, 2019 on OpenEBS's Medium Account


Managing Ephemeral Storage on Kubernetes with OpenEBS
Kiran Mova
Kiran Mova
Why OpenEBS 3.0 for Kubernetes and Storage?
Kiran Mova
Kiran Mova
Deploy PostgreSQL On Kubernetes Using OpenEBS LocalPV
Murat Karslioglu
Murat Karslioglu